Pages

Tuesday, January 31, 2012

Sympathy Cards

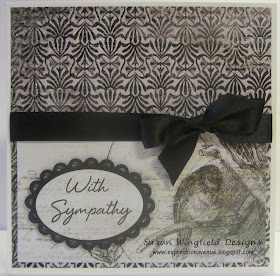
My Uncle Bill passed away on Saturday.  He was in his late 80s and was married to my Aunt Mary Louise for over 60 years.  He will be missed by many...such a kind man...always a favorite of mine.
I made this 6x6 card for my aunt using My Minds Eye Garden Vignette papers (which have a nice glittery sheen to them).  The sentiment was stamped with a Hero Arts stamp I had to cut because it was too long.  I don't usually cut my stamps but I need to not be afraid.  My stamping hero, Jennifer McGuire, does it all the time!  The oval shapes were done with Paper Trey Ink nested dies which came out just last month.  They cut great.
I actually cut two of the lacy oval and stacked one on top of the other with foam tape to give it a little dimension.
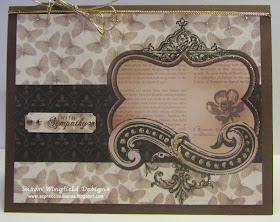
And I made a few cards for my cousins who lost a very dear father and grandfather.


 Those were done with a DCWV Mariposa Mat Stack I have had for some time.  Those papers make very pretty cards, I think.
I used an EK Success as well as a Stampin' Up  punch to cut the labels.  Paper Trey Ink provided the sentiment.  They were very fast and simple.  (I mean, how many times have I posted 5 cards in one day?!)
Well, I will be keeping David tonight so there will be no time for crafting, I'm sure!!!

Happy Crafting to you all...and I think my Silhouette may arrive tomorrow!

Sunday, January 29, 2012

I Did It!

After much review and time spent researching and investigating I BOUGHT A SILHOUETTE CAMEO!  I love my Cricut and know I am only 1/4 of the way through my own personal challenge of using all of my Cricut cartridges but I just couldn't resist.  I found a decent price through Amazon with free shipping and I just learned that Silhouette America is offering a 25% discount on subscriptions through February 3rd.  There are some wonderful files in the shop that are just begging to be put in my shopping cart.  I've just heard such wonderful things about the way this machine cuts so we shall see! 

I just got notified through Amazon it will be here February 1!  Woohoo!!!  Don't you love Amazon and their free shipping?

I also bought another little toy recently and hope it arrives tomorrow so I can share it with you.

No time for crafting the last few days...too many other things going on but life is GREAT!  I got to spend some time with David today...we went to the playground and he had lots of fun running, running and more running!  I love that kid!  It's so much fun watching him grow...

Hope you all are getting some crafting in!

Thursday, January 26, 2012

Valentine's Cards or Egads(!) She Did it Again!

I made  a couple of versions of this card the other day. And yes...EGADS(!) she did it again...she pulled out THE BEAST and used it and even did a reasonable impersonation of a straight stitching!  I'm getting good, I tell you!  Before you know it the fashion houses in New York will be calling on me for my skills...and then sadly, I won't have time for scrapbooking and cardmaking any longer.  How sad....

This little card was made with some gray and red Bazzill cardstock, a Valentine print from Hobby Lobby's Paper Studio, a Hero Arts valentine set of sentiments that is relatively new, I think, and a few little silver stud looking gems thingies.  I think they are also Paper Studio. The hearts were cut at 3/4 of an inch with the Baby Steps Cricut cartridge.  I placed one heart on top of one secured with a little glue on each of the "wings" of the heart (make sense?) and taped it's wings down with removable tape. I  know The BEAST does not like having to sew through glue or other adhesives (and you really don't want to annoy the BEAST...believe you me!).After the top hearts were secured by the stitching I just removed the tape.  I love removable tape and use little sliver all the time to keep things in place.  I didn't want my little hearts slipping on me, you know...

Here's my jabberwocky closeup (don't you love that word "Jabberwocky"...love that Lewis Carrol poem!..."Twas brillig and the slithy toves...")

Hope you enjoy looking at my creation...thanks for stopping by and now I am off to see what you all have made (in between watching a replay of the Federer/Nadal tennis match in Australia!).

Happy Crafting!

Wednesday, January 25, 2012

Gift Card Enclosure

A quick post here....I made this little gift card enclosure to go with the baby girl card I made yesterday. I used the Card Keeper stamp set from Art Imaginations.  I made a few of these at Christmas and you can see one example HERE.  They are quite easy and fast to whip up unless you forget to cover your ink pad and accidentally put your paper in it in which case they take twice as long to make!


I also used Tiny Tags and Tiny Tags 2 with the coordinating die from Paper Trey Ink.  Those tag sets are great and like the stamp set I used for the gift card enclosure something well worth the price because they are versatile and can be used over and over again! 

Here you can see the little tags which were stamped with some Stampin' Up ink.


  The It's a Girl stamp is from an old set I got on Clearance at Walmart a long time ago...Rhona Ferrer from Autumn Leaves. The stamps are so old I had a hard time removing them from the plastic!  But they are oldies but goodies, know what I mean?

Hope you all have a wonderful day and get some time in fro some creating!

Happy Crafting!

Tuesday, January 24, 2012

Cricut Challenge 28 and 29: Baby Girl Card

I've had two friends in the past couple of weeks who became grandmothers to baby girls.  Exciting times for me as some of my friends are also entering the era of grandmotherhood!  Congratulations, Debbie and Nancy!

I recently purchased the book All Occasion Cards for Cricut through Blitsy which, by the way, is a FABULOUS site for discounted products for the crafter....lots of great scrapbooking and cardmaking stuff there at wonderful prices.

Anyway, this card was in the book and I made my version with Martha Stewart girly papers I had gotten on clearance at Michael's before my own grandbaby girl was born.  I used Graphically Speaking (my friend, Deb Wing used to emphatically refer to this cartridge as "THE BEST EVER" and she would state it complete with wonderful hand gestures) and Plantin Schoolbook Cricut cartridges which, DRUM ROLL PLEASE, are two more cartridges I can knock off my personal challenge to make something with every Cricut cartridge I own.   I love that...two birds with one stone...two cartridges with one card!  :)

Here's the card for the cutie patootie baby:
And a closeup....did you see the Nichol Magouirk podcast on photographing your cards and scrapbooking pages.  Well, she says to take angled pictures of detail so that's what I did here:

This angled closeup shows the glitter on the stars which was a huge mess to work with! LOL!!! 

Sometimes angled photos which have become so popular give me vertigo.  Seriously.  Especially when there are people in them! Just thinking about it makes me feel queasy....  (not really...)

This was simple to do other than the mess with the glitter (!)...all the cuts and sizes are in the book and I just followed it with my own papers.  It actually worked up pretty quickly. For me quick means under 3 hours! Haha!

Does anyone out there want to come reorganize my scrapbook room for me?  It's getting way out of control!!!

Happy Crafting and for me that also means Happy GET YOURSELF IN YOUR ROOM AND CLEAN IT UP BEFORE YOU START ANOTHER PROJECT OR BUY ONE MORE THING!

(hmmmm....wonder if my Paper Trey Ink order will be here by tomorrow?)

Monday, January 23, 2012

And I Didn't Burn the Carpet!

So today's little Show and Tell is a little gift enclosure card that I embossed on  Paper Trey Ink's Royal Velvet with a new set that was released in November titled Stitches and Swirls.  I used Zing white embossing powder and then tied a little white cotton crochet yarn around it.

There are two reasons I am showing this....
1.  The embossing is practically perfect.  No smears...no extra flakes...the stitches are defined.  Sometimes I don't know my own strength when I stamp and sometimes I press too hard and get a goofy looking image.  I was really happy with the way this embossing turned out and I think the white on the Royal Velvet cardstock is so striking.
2.  The second reason I'm sharing this simple little card with nothing extraordinary about it is that I DID NOT BURN THE CARPET!

I have some notoriety in scrapbooking circles locally as "The One Who Burns Carpet" or "Crispy Chick"!  Once I was at a crop at a friend's clubhouse where they had just laid NEW carpet due to flooding.  Well, I was happily embossing some Christmas cards on the floor because there was no table space and imagine my horror (!) when I picked up the cards and had a lovely burned stenciled outline around where the cards had lain!  Ooops!  In my defense the carpet that had been laid was this really cheap plastic stuff...almost like astroturf and the plastic just MELTED!  LOL!!!  Only cost me $50 to repair, though, so that wasn't too bad.  LOL!  The carpet had only been down about a week.  I do have that picture somewhere, I'm sure!

And then once to further cement my status as "Crispy Chick" I was drying my hair at a scrapbooking retreat house and was sitting on the floor.  I would dry a section and then lay the hair dryer down, dry a section, lay it down.  There were about 25 women (slight exaggeration) sharing a bath and a half (not much of an exaggeration!) and the only place to dry hair was in the bedroom...there was a full length mirror but it was on the floor so to see yourself in it you had to sit down.  When I was done I noticed a few dark spots on the carpet.  Yep....burned again!!!

So, the heat embossing gun or anything that blows heat is not always my friend.  But it sure made for an entertaining story!...which gets retold at EVERY cropping thing I ever go to....and even gets talked about when I'm NOT present! LOL!!!

Happy Crafting!

Sunday, January 22, 2012

Flutterby Card

Don't you love the way kids say "flutterby" instead of "butterfly"? 
Being a speech therapist by trade I love the way children develop language.  Right now little David who is 2 and a few months will say "have it" (or more specifically he says "HAFF IT")  instead of "I want it."  For example if he drops an item on the floor out of his reach he will say "Omie, have it" which translates to "Omie, crawl on the floor under the table...watch out for the bread and butter I dropped and get my *fill in the blank* because I WANT IT NOW!" I know this for a fact.  Yesterday when we were at Cheesecake Factory celebrating my son's 25th birthday he said "Have it" several times to me as he dropped his car, his truck, his book, his crayons and his Thomas the Train at leas 21 times each.  I got very intimate with the floor under the table at Cheesecake Factory.  I will admit the floor looked much worse when we left than when we were seated!

Here is  today's Flutterby card:

The card was inspired by something I saw on Pinterest...a similar card but the inspiration card was done with the larger Martha Stewart punch. Click HERE is a link to that card. (Unfortunately the link does not take you to the site of the original card.)  I just see now where the card was also stitched.  I should have done that, too!  Now that I am pretty good at corraling my beast!
I used the new EK Success (Ok, it may not be new but it is new to me) to punch the butterflies.  The punch I used has three settings...one with a fully punched out butterfly with the more intricate look, a second that actually just punches out part of the inside of the butterfly and the third setting is a shadow or base.  In this card I only cut the "intricate" butterfly and the base.  I mounted the butterflies on kraft cardstock and then put it on a white card base.  The sentiment came from a Close to My Heart set I have.  I didn't use any foam tape but the butterflies are just glued in the centers so the wings are free and slightly bent to give a bit of dimension.

I think I will have to make more Flutterby cards!

Happy Crafting

Saturday, January 21, 2012

Missing in Action! and Card!

Wow, it's been over a week since I posted last!  The time just flies!!!  Really amazing...
Lots going on in the past week.
1. My daughter was sick so I helped out a bit.
2. Still getting over this congestion which has lingered for over 2 weeks.  I'm one of those people who NEVER gets a cold...so why is it that when I get one I can't get rid of it???
3. My ladies tennis team came in second for this season so we will be going to playoffs which will begin next Thursday.  Now I have the difficult captain's job of deciding who gets to play and who has to sit! 
4. The Australian Open has been on and I have probably watched 80 hours of tennis! It's been a great tournament so far.
4. My son turned 25 today so we had a family celebration!  Woohooo...Happy Birthday, Jeremy!

Lots to keep me from my craft room! 
But, I did get down there yesterday to do some reorganizing and pre planning and did make a couple of cards.  I'm hoping for a little more time tomorrow.

I saw a card Christina Thomas of Creations with Christina made recently with some messy machine stitching and I liked that look and let's face it...sewing messy is much easier than sewing straight! LOL!

So once again I pulled out the beast and used it for this card:
See my messy stitching?  Isn't it cute?  I used Paper Trey Ink's Flower Fusion #2 stamps and coordinating dies.  The purple flower is cut out with PTI's wool felt.  The button is from PTI, also and is Pure Poppy in color.  The red flowers were stamped on white cardstock with Pure Poppy Ink and cut out with the same die and popped up some foam tape.  The sentiment is also from that set.  The green ink for the leaves and stems is Garden Green from Stampin' Up.  I used some Kraft paper I got at Joann's and smooth white cardstock for the card base from Georgia Pacific.
And here's a closeup....and you can see the fuzzy felt.  Love it!  I added a little Bazzill Bling and there you have it...a masterpiece!  OK, no masterpiece but a simple card that came together pretty quickly!


Happy Crafting!

Friday, January 13, 2012

Taming the Beast???

I wrote about my phobia with my sewing machine.  I'd rather bungee jump than use my machine and I also don't like heights! (Ok that may be a stretch but you get the idea!)  I truly am deathly afraid of spiders...I can handle a snake but a spider reduces me to screaming mush (does mush scream?)!  My fear of sewing machines is not far behind.  I mean, I don't get a visceral reaction to my sewing machine like I do when I see an eight legged creepy crawly thing (*shudder*) but it's not far behind.
But what do you do when you fall off a horse...you get back on...so I decided to do yet another card with some machine stitching.
See?
Can you see the zig-zag stitching?  No?  Well, here's a better view...
Are you impressed?  Huh? Huh? Huh?

I think there is some irony that this is also a sympathy card...

Anyway, I used DCWV papers, the Mat Stack 3 from Paper Trey Ink, a little sentiment I had from another set called Woodlawn (that I bought at a craft show once and have never seen again), some ribbon from Hobby Lobby, the blue/green paper is from Paper Trey Ink and the butterfly stamp is from Unity Stamps Bevy of Butterflies (a great set for the butterfly lover). I also used a little glitter ink on the butterfly.

And that was it...a nice elegant and classic card WITH STITCHING!!! 

Next goal...do it again on a scrapbook page!  I did it years ago but I'm loving the look and want to try that, too!

Happy Crafting!

Wednesday, January 11, 2012

Sewing Machine-a-Phobia

I love the look of stitching on paper crafts.  I enjoy hand stitching but I love when I see cards and scrapbook layouts done with machine stitching.

I, however, am DEATHLY AFRAID OF MY SEWING MACHINE!  We have a love-hate relationship...mostly hate on my end and I think the machine's love part is probably that it loves seeing me so frustrated with it.  My mom was a great seamstress.  She could do anything with a machine.  She made clothes, coats, drapes, tablecloths, all kinds of crafts.  I just knew when I grew up I would be like her.  Didn't happen.  I have had my sewing machine about 25 years...I got it shortly after my son was born and I was home on maternity leave.  I just knew I would learn how to sew all kinds of stuff while I was home with him.  I never did learn to sew from a pattern well...but I did make some curtains and some crafts...but mostly I was just plain scared of the machine.  It always seems to be possessed...had a mind of it's own and our minds were never on the same page.

But every now and then I pull out said machine and see if I can tame the monster.  Nope....I still haven't tamed it but I did do a little sewing tonight on a few cards.  I'll post one tonight and the other tomorrow:
 This card was made with papers from the Sidewalks line of the October Afternoon stash I've been using lately.  I used another new Hero Arts set which came with the Sizzix dies (just LOVE those sets).  It was fun and worked up pretty fast.  And yes...I sewed all 4 sides AND an extra part on the bottom just for the heck of it! 
Probably need to increase the tension a little but I'm afraid to do anything like that because the monster will certainly retaliate!

Happy Crafting!

Tuesday, January 10, 2012

Thank You Card

I bought some new toys recently including this set of stamps and coordinating dies from Hero Arts and Sizzix which is an awesome little set! It's simply called "Bicycle" and you can see what the set looks like here:
And here is the card I made with the same October Afternoon papers I used in the layout I posted yesterday.  I just love the vintage feel of this line...just brings back my childhood!  I swear I will see Sally, Dick, Jane and Spot (Run, Spot, Run!) running across these papers!

Other than the papers and twine from October Afternoon, I used some Close to My Heart Ink, a couple of silver brads on the tires and my Martha Stewart fringe scissors to make the "grass".  I love mixing up prints and using them unconventionally in my cards and layouts...for example, using the yellow floral print for the grass.  I just pat myself on the back when I do this and go..."you go, you artist girl, you!"  HAHA!  I did pop the bicycle up on some foam tape to give it a little more dimension.  I love the banner, too...they are so trendy right now, aren't they?

I think it turned out really cute and these dies and stamp sets work up into wonderful looking stuff very quickly!

Happy Crafting!

Monday, January 9, 2012

Cricut Challenge 27: Wrap It Up/ Our Budding Artist and Sculptor

David goes to a Mother's Morning Out program twice a week.  Good for him to go and be with some other children and good for his mother to get a breather.  He wasn't too sure about it the first week and we had lots of tears but now he goes happily and seems to enjoy himself.
Just before the break for the holidays the class had a Christmas party.  One of the activities was for each child to decorate a sugar cookie.  They were given the sugar cookie complete with icing and sprinkles and then were handed some gumdrops to "decorate" their cookie with.
All of the other children just plopped the gumdrops on the cookies except for the few who ate them...David took his job very seriously and very,  very carefully placed the gumdrops on his cookie and then looked up at me and declared, "Castle!".  He had sculpted his very first castle!  After he was finished he looked at his work and proceeded to remove the gumdrops and then ate his cookie!  Such a smart and creative little two year old. :)

So, I created this one page 12x12 layout to commemorate this event.  Here it is before I finished it up on my brand new Scrap 'n Easel that I received as a Christmas Gift from my daughter.  Did I say I love it?  It's so wonderful to see your layout at an angle that does not cause neck strain! Here the castle and circle are not adhered but are being held down by the super strong magnets.  I love this thing!

I used this page from the February, 2012 Scrapbooks, Etc. as inspiration...what caught my eye were the pictures...all done at about wallet size.  I just liked the way they were clustered together and I liked the white edges to them. Ooops...I confess...I tear up my magazines.  Yep, it's true...as I read them (and I usually just go through them once, now)...I tear out the ideas and pages I like and then I throw the magazine away.  If I use a page as inspiration once I done with it out in the trash it goes!  I love my system but I am reckless when I rip magazine pages....!


I used October Afternoon Sidewalks papers and baker's twine (LOVE THIS LINE...it reminds me of the Sally, Dick and Jane primers I learned to read from). Stickers were from the Lunchbox line (also October Afternoon).  I cut the circle out with my EK Success Circle Scissor (haven't used that must have tool in years! LOL!), and the castle at 4" from the Wrap it Up Cricut Cartridge.  I inked edges with the new We R Memory Makers Sweetheart Inkers (brown).  I also used the new Creative Memories border punch tool.  I don't own it but I was cropping with my friend, Cyndi, who has one of everything known to man (or at least to scrapbookers) and she let me borrow it.

And here's the final page with some journaling strips:
Here is a  better photo of it:
Well, sort of better....but I'm still loving my Easel.
And here is a closeup of the castle.  I love the mixes of prints.

I love the way it turned out.

I love my little guy and artist/sculptor and castle builder.

Happy Crafting!

Sunday, January 8, 2012

Cricut Challenge 27: Kate's ABC's, Calendar Book Part 2 and WHO DID IT?

OK....first of all...who is responsible?  I had the mother of all head colds this week and I want to know who is responsible for giving it to me???
Actually I know exactly who the responsible parties are...here they are...let's call this Exhibit A:
Yes, both kids have been sick with upper respiratory stuff.  I had been bragging about how I had not had a cold in yadda, yadda, yadda years even though I had been around the kids a bunch...but my mouth must have been open during the bragging because one or both surely must have coughed or sneezed in my mouth...and yep...the New Year rolled in for me with a massive head cold.  
So I've been under the weather so to speak this week...couldn't hear, couldn't talk in a way others could understand me, couldn't taste...and couldn't breathe!  
But I found a wonder drug so if you get to where you cannot breathe I highly recommend this:
 I hate nasal spray...there is something about sticking something up your nose and spraying stuff in it....just very unappealing to me but this stuff is a wonder drug.  I sprayed that stuff and within 3-5 minutes I could breathe!  It was just amazing.  I was demonstrating to my husband how I could breathe.  It was like I had finally learned a new SKILL! HAHA!
So, this hasn't been the most creative week...it's been a mostly nose in a kleenex kind of week....but I will survive.

I did finally get the cover of my calendar book done and TA DAHHHHH.....drum roll, please....I used Kate's ABCs cartridge for the first time (so this counts towards my personal goal of using all my Cricut cartridges...wooohooo!)  to cut the year numbers out of Tim Holtz Grungeboard.  I used the deep blade housing and did 2 cuts....probably needed a little more depth or a 3rd cut but it cut out pretty well.  

I painted the Grungeboard numbers with a Pearl Paint Dabber...I used a Hero Arts background stamp for the left side of the  book...also inked with the Pearl paint.  Added a little ribbon and that was it.  I really didn't want a  bunch of stuff on the cover as this book will be used daily during the year and I didn't want a lot of embellishments that would be knocked off easily.
So I'm happy with it...and I will say I've written on each page and have a picture for the first week in mind that I will get printed and adhere...I think I'm liking my new little calendar and journaling book.

Happy Crafting!

Monday, January 2, 2012

Calendar Project Part 1

I don't often make new resolutions...or maybe I should rephrase that.  I don't usually stick to my New Year's Resolutions but nearly every year I resolve to keep a journal.  I never make it past the first week. I admire those people who keep those wonderful artsy journals but I just can't seem to make myself want to sit down and write on a daily basis.  I've even tried online daily journals...I thought typing it in would help.  Nope...gave up on that after about 2 weeks.  The only time I do adequate journaling is when I travel and it's mainly so I can remember what all I've seen and visited.
So what was my New Year's Resolution for 2012....why, "Keep a Journal", of course.  But this year I decided to do something differently.  I decided to make a little journal/calendar book.  It's not quite completed but I want to share with you how it's coming along.
The first thing I did was get 2 sheets of medium weight chipboard and cut them both at 9 3/4 inches by 7 1/2 inches:
I bought this chipboard from JoAnn.com a while back.  It comes in 12x12 sheets and in a pack of about 50 (or maybe it's 25...not sure about that).  It's a nice weight chipboard and perfect for mini book covers.  And that's what my two pieces were for...a front cover and a back cover.
Next I created a calendar page in Photoshop Elements.  My friend, Paula, helped me do this...I tweaked it a little and was happy with the result.  The large rectangle on the left is 4 inches wide by 6 inches long so will be the perfect size for a photo. 

I printed them out on 8 1/2 x 11 sheets...this is how they looked trimmed down.  I wanted the left margin to be a bit wider than the right for the binding.  Some were printed out front and back and some were just printed out on one side only.  I planned how my months would be laid out.
Here they are as I was trimming them:
 I made sure that the fronts and backs were aligned perfectly so that there would be uniformity.
I used DCWV papers to cover the chipboard covers:
And some papers for the inside covers:
 Then I covered slightly smaller sheets of cardstock with paper and put tabs on each.  The tabs were cut out with Spellbinders dies and the months were stamped with Close to My Heart stamps.
Then I stamped little monthly calendars and attached those to the corresponding tab page:

I haven't added much other embellishments yet....I really don't want the pages to get really thick so I'm not sure if I'll add more or not. 
I bound the book using my Cinch...you can see the binding here, too and I also put a little pocket page on the inside cover in case there is something I want to stash in there (!):
 And yes, I have done 2 days of "journaling".  That's better than I usually do! HAHA!
I still need to finish frou frouing up the cover.
That will have to wait...today was the big ol" TAKE DOWN THE DECORATIONS DAY so have spent a good part of my day putting things away.  And that part is almost done!

Happy Crafting!

Sunday, January 1, 2012

Cricut Challenge 26: Winter Lace and Happy New Year to You!

Wow...2012.  Wow....It just seems like we were all dealing with that Y2K stuff not long ago.  Do you remember that?
I have been able to get back into my craft room the last couple of days for an hour here and have been working on a project which I hope to share in the next couple of days.  It's not quite finished...had hoped to finish it up today but we had the whole family here (my son, daughter, son in law and 2 grandkids) for our traditional southern New Year's dinner.  Black eyed peas, greens (we prefer turnips to collards), mashed potatoes, corn bread and ham.  We eat black eyed peas, greens and corn bread at New Years in the south for good luck.  The black eyed peas represent coins, the greens represent paper money and the corn bread represents gold.  I love old traditions.  Anyway, dinner was yummy and now we all have full tummies with good luck foods!
Anyway since the family was here I couldn't finish my little project so it will have to wait a day or so before I can share it with you.
Here are a couple of cards (bad angle, bad photos) of two cards I made with all Paper Trey Ink products.


I love the little penguin die and shared a card I made with him the other day.  He was so worth the price I paid for him...which I think was just $5.  He's just as cute as can be....the little coordinating stamp set is also inexpensive.
I made these cards for my kids as New Year's wishes.  I thought the cards turned out cute...I think they liked what was inside better! HAHA!
I did cut the snowflake with the Winter Lace Cricut Cartridge and WOOO HOOO...I haven't done a project with that cartridge here so I get to add this to my personal Cricut challenge of making a project with each Cricut Cartridge I own!  I am up to #26...that means I'm about 1/5 of the way there...and I keep acquiring more cartridges!
Life is good...
Well, tomorrow will be the day to take down the decorations and pack them up for another 11 months.  Haha...before you know it we will be dragging it out again!

Happy Crafting and Happy New Year!