Showing posts with label Archivers. Show all posts

Wednesday, September 12, 2012

Mini Cards

Quick post today...places to go and things to do!

Without much ado...here are a couple of little Halloween cards I made at Archiver's recently:

Very simple...the little ghost card was done with a scalloped edged card....you just cut off some of the scallops to make him a bit thinner and more ghostly.  Rounding the edges help, too!  A little gray ink around the edges, some baker's twine and some googly eyes finished him off.
The candy corn card was just done with a piece of cardstock folded and then cut into the shape of the candy corn and layered with some papers.  An edge punch was used for the scallop and I stamped the sentiment with a Hero Arts set.
And that's it!

I entered this int he following challenge:
Simple Salutations #11

Happy Crafting!

Sunday, September 9, 2012

Not My Design....but....

....it's still stinkin' cute!
And how easy to make!
This little gift box or bag would be so cute to put some treats in.  Archiver's provided the directions during a recent class I took.
 Basically you take a 6x9 inch sheet of cardstock...double sided prints work nicely.  With a couple of score lines and a couple of snips and cuts you end up with two sides which you adhere together.
I used a Martha Stewart punch to emboss and punch the jack o'lantern and a scalloped punch to frame it...added a little ribbon and some baker's twine and was done.

I love Halloween....it will be here before we know it!

Happy Crafting!

Saturday, April 14, 2012

More Watercolor Woohoo....

After I got back from my class yesterday I came home and completed these two cards, as well.  We had stamped the images at Archiver's (with their stamps...yay!), embossed and they were ready for watercoloring.

I rather like the way these turned out...

This bicycle was probably a little more difficult because there was so much blue to shade but it was fun trying...
I put some Stickles in the flowers:
And some Gelly Roll work on the spokes and parts of the bicycle.

And I did this lovely and vibrant hyacinth:
I thought the coloring and shading on this turned out nicely.

So what did I do today? I went and bought more Copics! LOL!

Happy Crafting!

Friday, April 13, 2012

Winner, Winner, Chicken Dinner and a Few Cards...

I went to Archiver's Today for a "Coloring" class.  Too funny.  I've been "coloring" since I was a little girl....who would have thought that in my "mature" years that I would be taking a class on coloring!  But that's exactly what I did!

The wonderful and awesome Suzi taught the class...she is definitely one of my favorite Archiver's ladies...she's always so helpful and knowledgeable and she always makes us laugh with her humor!  Lots of fun that girl is!

So the class was on coloring as I said.  We stamped and embossed images on watercolor paper.  Now I have watercolor paper I've bought in the art departments of the various stores I shop in but this paper was much smoother than what I have purchased in the past and took the embossing very well. 

We used Tombow water based markers to color in our images trying to shade and blend a bit as we went.  Sometimes we just picked up color and water from a craft mat and sometimes we stroked the pen directly on the paper.  It was fun and although I think everyone in the class felt they needed to work on this newly learned skill a bit more most were relatively happy with the results.

Here are the 3 I was able to complete:


On the hydrangea card we also used some yellow or gold "Smooch" (which is like a metallic paint and comes in a little bottle reminiscent of a fingernail polish) for the centers of the flowers. 

The birthday greeting card was done with a little Flower Soft in the centers of the flowers and a little Stickles applied to the dragonflies and butterflies (and yes, Cyndi...I did touch the Stickles before it was dry...OF COURSE!).

The tulips greeting card had some glitter Gelly Roll pen work on it but can't really be seen in the photo.

It was fun....and I did like the technique and will definitely use it again.  I've done water coloring with pencils but I think this method gave a much more vibrant color.

Now on to the second part of my long post today...a few weeks back I entered some of my projects (2 layouts and a card) in a contest at Art Made With Heart ...for each project you got a certain number of entries and you could also get an entry for Tweeting, posting on Facebook and so on.  Shanna Vineyard (the owner of the Art Made With Heart blog) had created this adorable digital kit that I used with my Silhouette.  You can see my projects HERE, HERE and HERE.

Well, all my hard work paid off and I WON!  Woohoo!!! The prize was a huge box of BoBunny papers, chipboard, buttons, stamps, mini albums, embellishments and more!  I was stunned! 
First is the Et Cetera line:


Also included was the Enchanted line... a beautiful and elegant line:


And lastly the colorful Alora line:


Wow!!! What a lucky girl I am!  Thanks, Shanna for all the goodies!!!

Happy Crafting!

Sunday, February 12, 2012

Embossing Part II

I mentioned in yesterday's post that I did the recent Beautiful Blooms class at Archiver's.  I really do enjoy Archiver's classes...they are well organized...all the paper is generally cut...and generally I learn a few new things or a have few "Aha!...I would never have thought of that!" moments! This class was a good example of the "Aha moments"!

Here are the other two cards we made.
The first one was done with by stamping a floral background with Versamark onto watercolor paper.  We embossed with an opaque white embossing powder (Ranger Seafoam White).  We made a few puddles of Distress Stain on a piece of paper and used little paintbrushes to fill in the flowers and leaves.  Some did precise and neat painting...I went for more of the grunge/distress look (primarily because I couldn't see the images very well and secondly because I was lazy!....cardmaking on the lazy...my style!).  After it was dry we were told to lightly tap the Versamark pad onto the watercolor paper and then we sprinkled Holographic powder on it, heat embossed it and it gave it a little extra shine.  I probably went a little heavier on my card than was called for but I liked the way it looked all sparkly when it was done.
Here's a closeup:
We added some trim and also embossed a circle with a sentiment and then made a scalloped mat for it.  We also added some tulle to the front behind the circle....just sort of tucked it in and adhered it, added some bling (a girl's gotta have bling!) and we were done.
The last card we made I also really liked.

....and I bought this butterfly stamp as well.  To make the printed background we stamped paper with Versamark again (lots of embossing in this class!) and then used the opaque embossing powder to emboss the background flower image.  After it had cooled we rubbed Scattered Straw Distress stain over the image and the embossed areas resisted the color.  Very cool look, I thought.  We also took some white cotton trim and dyed it with the same distress stain.  Also cool looking, I thought.
We stamped the buttefly image onto white paper with Versamark and then sprinkled a couple of different colors of embossing powders on the image to, again, give the same variation in color look like we did with one of the cards I posted yesterday.  I love this...I always loved stamping with those multicolored ink pads that gave almost a gradient look but just never do that anymore.  But this I loved!  We added a couple of flowers and used some crackle paint on to to dress them up a bit...added our required bling and we were done.
Closeup:


Great cards, Archivers...and this class did what it was supposed to do...it made me run into the store and grab up the supplies! ;)

Happy Crafting!

Saturday, February 11, 2012

Embossing My Way Through a Class!

I went to Archiver's yesterday and took the class being offered now called "Beautiful Blooms" and is a class designed to teach different embossing techniques using Hero Arts stamps.  I loved the cards and found myself buying many of the supplies so I can make similar cards.
The first card we made was this one:
We stamped the background with Champagne Versamark and sprinkled clear embossing powder on it as well as Holographic powder.  Zapped it with a heat gun and it left and nice shiny and glisten-y background.  We stamped the Truly Grateful sentiment (oh, yes, I had to purchase this fabulous set of sentiments) with Versamark and then used Ranger embossing powder ( Lettuce) on it.  We added a little trim and a few jewels after using a border punch for the blue mat and that was it.  Simple but elegant, I think...
Here's a closeup:
Simple but pretty, I think.
The second card we made turned out to be my favorite.  I LOVE tulips and I just loved this stamp with what looks like a text background to it.  Here it is:

Of course I had to have this tulip stamp too...even though I swear I am not buying any more wood block mounted stamps!!!  I just found myself loving this image so much that I bought it.  I think it will make lovely sympathy cards as well as thank you, thinking of you...etc.
We stamped the flowers with Versamark and then we used three different embossing powders to achieve the results. I loved the variations in the colors.  So pretty, don't you think?  We stamped the sentiment and then put powders over it as well to give a variation.  After we had heat embossed we went back with a Versamark pen and highlighted some of the stems and leaves as well as the base of the flowers and sprinkled Holographic powder over this and heat embossed once again.  Soooo pretty!
We did use a Corner Chomper on the top corners of the card and mat and then we used a little tulle ribbon for a tie at that top, added a little bling and that was it.
Here's a little closeup of the tulip image:

These are relatively fast cards to make but they have a lovely look to them, I think.

Happy Crafting!

Wednesday, November 23, 2011

I Refuse to Give UP!

Since I returned from my trip to Scotland and Ireland in the middle of October I have been seriously behind on my crafting...especially card making and scrapbooking!  I have pictures to scrap, paper to be used, embellishments to adhere and so on but they don't seem to be making their way to finished products!  I have been working on some little gifties for a group of girls.  We all have a love a paper and scrapbooking and we call ourselves the Sharecroppers.  Now, we have nothing to do with farming or harvesting crops...many of us probably can't even grow silk flowers (me!) but we call ourselves that because we are the greatest at sharing.  We crop together....someone will say "Does anyone have a fill in the blank and a half dozen hands might shoot up!  We love to share so someone coined the term Sharecroppers for us.  Anyway, there will be 18 of us gathering this year at a friend's house for food, drink, games and SHARING! :)
But I can't show my gifties as some of those ladies read my blog and I don't want to ruin the surprise.  It's simple but useable and I'm hoping they'll like it.

I did go to the tag class at Archiver's a week ago with 2 of my Sharecropping friends, Cyndi and Christine.  It was a lot of fun and we had fun stamping, embossing, painting and doing all kinds of techniques.  Some of the tags were so cute...

Like this one...made with a wooden cut out, painted and some bling adhered to it and backed it with some pretty two sided paper.
 This one was a tree pattern embossed on a piece of green Core'dinations cardstock, sanded, inked, and Stickles "adorned".  It was then adhered to a piece of burlap.  Too cute.
This cute little gingerbread man was cut out with die and then adhered to a canvas tag that we stamped the tiny snowflakes on.  Cute and easy!

This one took a little more time because we colored the car with pencils and did blending with Gamsol (odorless mineral spirits) and then cut it out.  I could have done a better job stamping the sentiment but oh well...

The next two were just die cuts but sure make cute tags with little extra bling or any additional embelishments:


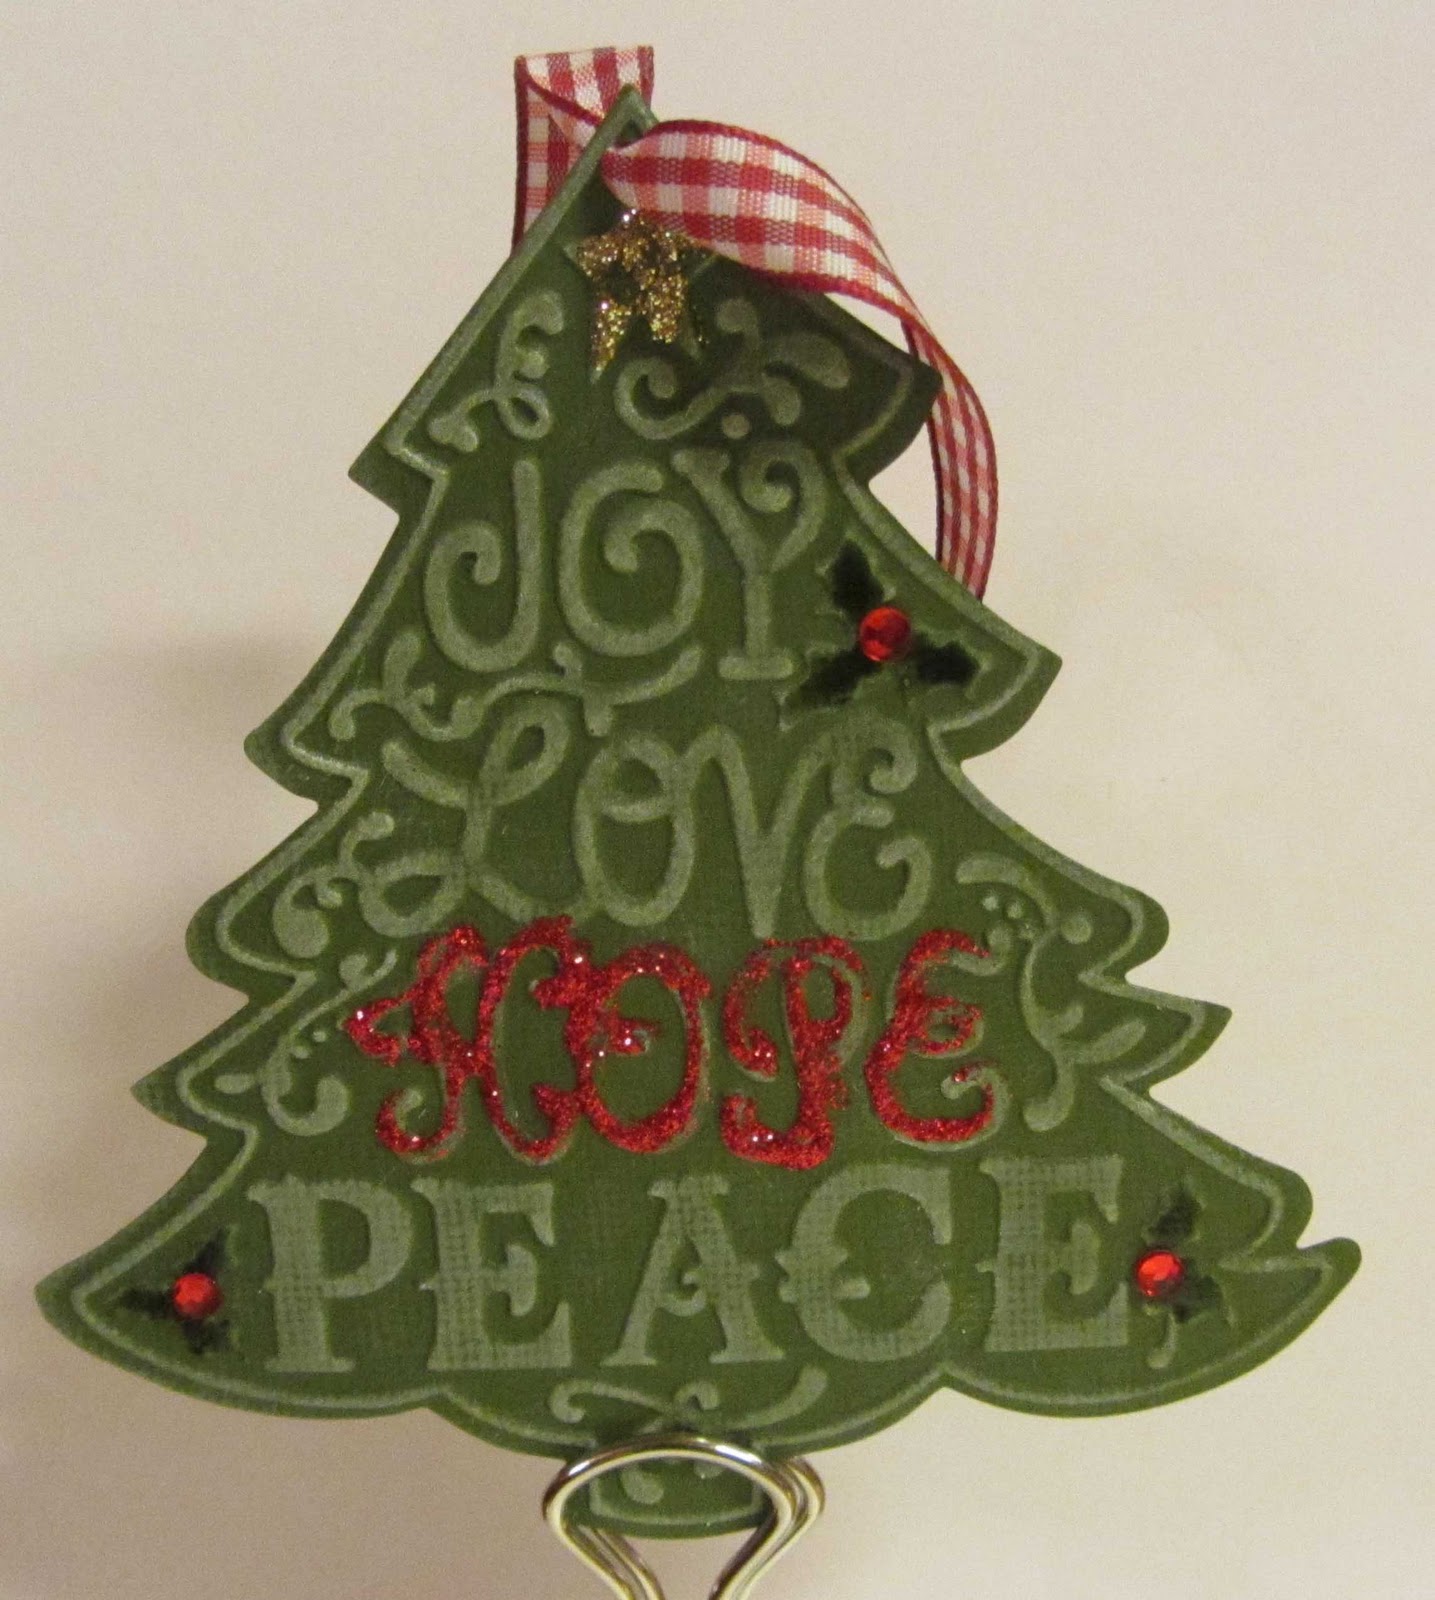
This last one I would do differently if I ever did it again...It is a Sizzix die and embossing bundle that creates this great tree.  We then inked it to bring out the embossing and used Stickles to highlight the word "Hope".
We added some Stickles on the holly leaves and then a little bling for the berries.
I do love that gingham ribbon!

Anyway, I REFUSE TO GIVE UP and hope to be back with some fabulous crafting, card making and scrapbooking ideas soon!  But first there is a dog to bathe, a floor to vacuum, a turkey to roast, a pie to make, etc!


Hope you all have a wonderful crafting day and a fabulous Thanksgiving surrounded by family, friends, and good food!

Wednesday, November 9, 2011

Trip to Archiver's

I love that we have a great scrapbooking store relatively close to me.  I do like shopping and ordering online, of course, but sometimes you just need that touchy feely experience.  Joann's, Michael's and Hobby Lobby are great, but it's also great going to a store that is totally dedicated to preserving memories and papercrafting.  And I do my best to keep them in business!

We used to have many independent scrapbook stores in metro Atlanta.  I even worked at one.  But now there are very few.  I guess it's just way too hard to turn a profit in this industry with a storefront. 

So, I'm hoping Archiver's will remain in business for a very long time.

I went on Saturday to do the make and takes they were featuring...two simple cards.
Here they are:

I especially love the little square card.  And how simple this was...one of those "reverse" type stamps, Zing silver embossing powder, a red Copic marker and some Glossy Accents on the cardinal.  So simple and fast but really cute.

And I'm up to my ears searching the internet for more crocheted goodies to make! HAHA!!! 

Happy Crafting!

Monday, August 29, 2011

More Mini Cards

Yesterday I put up a few mini cards I made during a class at Archiver's over the weekend. 
Here are a few more I did:
The card above was a simple double stamping technique...you know where you stamp on your base...then stamp on another piece of paper...fussy cut it out and adhere it to your original shape with a pop dot.  I love this look...and I love when people stamp the image multiple times.  I, however, am too lazy for that!  We did add some Stickles to the little bee for a little something extra.  CUTE!

The next card was a simple card but a new little technique.  We had a square of printed paper (double sided) and made a few snips in the paper and folded the flaps to create a pin wheel.  Very easy, very fast and VERY CUTE!


The third card I'll show today is this one:
We basically stamped the tree image and then used various paint dabbers (Jenni Bowlin) to give different colors to the trees.  We actually inked up a flat circle stamp and then just stamped over the trees.   I love the look of that sentiment but I'm not sure of the manufacturer...sorry!  We did use Hero Arts, Inky Antics, Memory Box, Savvy, Technique Tuesday, Tim Holtz, and Unity stamps (did I say I love Archiver's classes where we get to use all kinds of different product???!).


These mini cards are just great...and they are so fast and easy.  A few scraps of paper..a stamp...a border punch or two...and you can have a really cute card! 

Hope your week starts out beautifully!

Happy Crafting!