Tuesday, January 31, 2012

Sympathy Cards

My Uncle Bill passed away on Saturday.  He was in his late 80s and was married to my Aunt Mary Louise for over 60 years.  He will be missed by many...such a kind man...always a favorite of mine.
I made this 6x6 card for my aunt using My Minds Eye Garden Vignette papers (which have a nice glittery sheen to them).  The sentiment was stamped with a Hero Arts stamp I had to cut because it was too long.  I don't usually cut my stamps but I need to not be afraid.  My stamping hero, Jennifer McGuire, does it all the time!  The oval shapes were done with Paper Trey Ink nested dies which came out just last month.  They cut great.
I actually cut two of the lacy oval and stacked one on top of the other with foam tape to give it a little dimension.
And I made a few cards for my cousins who lost a very dear father and grandfather.


 Those were done with a DCWV Mariposa Mat Stack I have had for some time.  Those papers make very pretty cards, I think.
I used an EK Success as well as a Stampin' Up  punch to cut the labels.  Paper Trey Ink provided the sentiment.  They were very fast and simple.  (I mean, how many times have I posted 5 cards in one day?!)
Well, I will be keeping David tonight so there will be no time for crafting, I'm sure!!!

Happy Crafting to you all...and I think my Silhouette may arrive tomorrow!

Sunday, January 29, 2012

I Did It!

After much review and time spent researching and investigating I BOUGHT A SILHOUETTE CAMEO!  I love my Cricut and know I am only 1/4 of the way through my own personal challenge of using all of my Cricut cartridges but I just couldn't resist.  I found a decent price through Amazon with free shipping and I just learned that Silhouette America is offering a 25% discount on subscriptions through February 3rd.  There are some wonderful files in the shop that are just begging to be put in my shopping cart.  I've just heard such wonderful things about the way this machine cuts so we shall see! 

I just got notified through Amazon it will be here February 1!  Woohoo!!!  Don't you love Amazon and their free shipping?

I also bought another little toy recently and hope it arrives tomorrow so I can share it with you.

No time for crafting the last few days...too many other things going on but life is GREAT!  I got to spend some time with David today...we went to the playground and he had lots of fun running, running and more running!  I love that kid!  It's so much fun watching him grow...

Hope you all are getting some crafting in!

Thursday, January 26, 2012

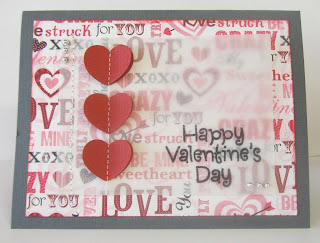
Valentine's Cards or Egads(!) She Did it Again!

I made  a couple of versions of this card the other day. And yes...EGADS(!) she did it again...she pulled out THE BEAST and used it and even did a reasonable impersonation of a straight stitching!  I'm getting good, I tell you!  Before you know it the fashion houses in New York will be calling on me for my skills...and then sadly, I won't have time for scrapbooking and cardmaking any longer.  How sad....

This little card was made with some gray and red Bazzill cardstock, a Valentine print from Hobby Lobby's Paper Studio, a Hero Arts valentine set of sentiments that is relatively new, I think, and a few little silver stud looking gems thingies.  I think they are also Paper Studio. The hearts were cut at 3/4 of an inch with the Baby Steps Cricut cartridge.  I placed one heart on top of one secured with a little glue on each of the "wings" of the heart (make sense?) and taped it's wings down with removable tape. I  know The BEAST does not like having to sew through glue or other adhesives (and you really don't want to annoy the BEAST...believe you me!).After the top hearts were secured by the stitching I just removed the tape.  I love removable tape and use little sliver all the time to keep things in place.  I didn't want my little hearts slipping on me, you know...

Here's my jabberwocky closeup (don't you love that word "Jabberwocky"...love that Lewis Carrol poem!..."Twas brillig and the slithy toves...")

Hope you enjoy looking at my creation...thanks for stopping by and now I am off to see what you all have made (in between watching a replay of the Federer/Nadal tennis match in Australia!).

Happy Crafting!

Wednesday, January 25, 2012

Gift Card Enclosure

A quick post here....I made this little gift card enclosure to go with the baby girl card I made yesterday. I used the Card Keeper stamp set from Art Imaginations.  I made a few of these at Christmas and you can see one example HERE.  They are quite easy and fast to whip up unless you forget to cover your ink pad and accidentally put your paper in it in which case they take twice as long to make!


I also used Tiny Tags and Tiny Tags 2 with the coordinating die from Paper Trey Ink.  Those tag sets are great and like the stamp set I used for the gift card enclosure something well worth the price because they are versatile and can be used over and over again! 

Here you can see the little tags which were stamped with some Stampin' Up ink.


  The It's a Girl stamp is from an old set I got on Clearance at Walmart a long time ago...Rhona Ferrer from Autumn Leaves. The stamps are so old I had a hard time removing them from the plastic!  But they are oldies but goodies, know what I mean?

Hope you all have a wonderful day and get some time in fro some creating!

Happy Crafting!

Tuesday, January 24, 2012

Cricut Challenge 28 and 29: Baby Girl Card

I've had two friends in the past couple of weeks who became grandmothers to baby girls.  Exciting times for me as some of my friends are also entering the era of grandmotherhood!  Congratulations, Debbie and Nancy!

I recently purchased the book All Occasion Cards for Cricut through Blitsy which, by the way, is a FABULOUS site for discounted products for the crafter....lots of great scrapbooking and cardmaking stuff there at wonderful prices.

Anyway, this card was in the book and I made my version with Martha Stewart girly papers I had gotten on clearance at Michael's before my own grandbaby girl was born.  I used Graphically Speaking (my friend, Deb Wing used to emphatically refer to this cartridge as "THE BEST EVER" and she would state it complete with wonderful hand gestures) and Plantin Schoolbook Cricut cartridges which, DRUM ROLL PLEASE, are two more cartridges I can knock off my personal challenge to make something with every Cricut cartridge I own.   I love that...two birds with one stone...two cartridges with one card!  :)

Here's the card for the cutie patootie baby:
And a closeup....did you see the Nichol Magouirk podcast on photographing your cards and scrapbooking pages.  Well, she says to take angled pictures of detail so that's what I did here:

This angled closeup shows the glitter on the stars which was a huge mess to work with! LOL!!! 

Sometimes angled photos which have become so popular give me vertigo.  Seriously.  Especially when there are people in them! Just thinking about it makes me feel queasy....  (not really...)

This was simple to do other than the mess with the glitter (!)...all the cuts and sizes are in the book and I just followed it with my own papers.  It actually worked up pretty quickly. For me quick means under 3 hours! Haha!

Does anyone out there want to come reorganize my scrapbook room for me?  It's getting way out of control!!!

Happy Crafting and for me that also means Happy GET YOURSELF IN YOUR ROOM AND CLEAN IT UP BEFORE YOU START ANOTHER PROJECT OR BUY ONE MORE THING!

(hmmmm....wonder if my Paper Trey Ink order will be here by tomorrow?)

Monday, January 23, 2012

And I Didn't Burn the Carpet!

So today's little Show and Tell is a little gift enclosure card that I embossed on  Paper Trey Ink's Royal Velvet with a new set that was released in November titled Stitches and Swirls.  I used Zing white embossing powder and then tied a little white cotton crochet yarn around it.

There are two reasons I am showing this....
1.  The embossing is practically perfect.  No smears...no extra flakes...the stitches are defined.  Sometimes I don't know my own strength when I stamp and sometimes I press too hard and get a goofy looking image.  I was really happy with the way this embossing turned out and I think the white on the Royal Velvet cardstock is so striking.
2.  The second reason I'm sharing this simple little card with nothing extraordinary about it is that I DID NOT BURN THE CARPET!

I have some notoriety in scrapbooking circles locally as "The One Who Burns Carpet" or "Crispy Chick"!  Once I was at a crop at a friend's clubhouse where they had just laid NEW carpet due to flooding.  Well, I was happily embossing some Christmas cards on the floor because there was no table space and imagine my horror (!) when I picked up the cards and had a lovely burned stenciled outline around where the cards had lain!  Ooops!  In my defense the carpet that had been laid was this really cheap plastic stuff...almost like astroturf and the plastic just MELTED!  LOL!!!  Only cost me $50 to repair, though, so that wasn't too bad.  LOL!  The carpet had only been down about a week.  I do have that picture somewhere, I'm sure!

And then once to further cement my status as "Crispy Chick" I was drying my hair at a scrapbooking retreat house and was sitting on the floor.  I would dry a section and then lay the hair dryer down, dry a section, lay it down.  There were about 25 women (slight exaggeration) sharing a bath and a half (not much of an exaggeration!) and the only place to dry hair was in the bedroom...there was a full length mirror but it was on the floor so to see yourself in it you had to sit down.  When I was done I noticed a few dark spots on the carpet.  Yep....burned again!!!

So, the heat embossing gun or anything that blows heat is not always my friend.  But it sure made for an entertaining story!...which gets retold at EVERY cropping thing I ever go to....and even gets talked about when I'm NOT present! LOL!!!

Happy Crafting!

Sunday, January 22, 2012

Flutterby Card

Don't you love the way kids say "flutterby" instead of "butterfly"? 
Being a speech therapist by trade I love the way children develop language.  Right now little David who is 2 and a few months will say "have it" (or more specifically he says "HAFF IT")  instead of "I want it."  For example if he drops an item on the floor out of his reach he will say "Omie, have it" which translates to "Omie, crawl on the floor under the table...watch out for the bread and butter I dropped and get my *fill in the blank* because I WANT IT NOW!" I know this for a fact.  Yesterday when we were at Cheesecake Factory celebrating my son's 25th birthday he said "Have it" several times to me as he dropped his car, his truck, his book, his crayons and his Thomas the Train at leas 21 times each.  I got very intimate with the floor under the table at Cheesecake Factory.  I will admit the floor looked much worse when we left than when we were seated!

Here is  today's Flutterby card:

The card was inspired by something I saw on Pinterest...a similar card but the inspiration card was done with the larger Martha Stewart punch. Click HERE is a link to that card. (Unfortunately the link does not take you to the site of the original card.)  I just see now where the card was also stitched.  I should have done that, too!  Now that I am pretty good at corraling my beast!
I used the new EK Success (Ok, it may not be new but it is new to me) to punch the butterflies.  The punch I used has three settings...one with a fully punched out butterfly with the more intricate look, a second that actually just punches out part of the inside of the butterfly and the third setting is a shadow or base.  In this card I only cut the "intricate" butterfly and the base.  I mounted the butterflies on kraft cardstock and then put it on a white card base.  The sentiment came from a Close to My Heart set I have.  I didn't use any foam tape but the butterflies are just glued in the centers so the wings are free and slightly bent to give a bit of dimension.

I think I will have to make more Flutterby cards!

Happy Crafting