Monday, November 9, 2015

Hello You!

When I was at the very impressive Impressive Ideas grand opening the other day I came across an interactive die by My Favorite Things Die-Namics.  It is called the Interactive Trio card and when cut on your handy dandy die cutting machine makes a little 3 window panel...but instead of having full cut outs of the "panes" it creates a score line so you really get a cute little flap.

So cool!

I spent way too much time making this card but it was very fun to do.  I CASEd (copy and steal everything) one by Stephanie Klauck at MFT but mine is a bit different...mostly because I didn't have all the stamps she used in her card.

Here is mine:

I used Things With Wings stamps by My Favorite Things


as well as the Scripty Sayings sentiment, "hello you", by Lawn Fawn.

 I stamped the sentiment with VersaFine ink and then heat embossed it with clear embossing powder (a favorite technique!).  The butterfly and ladybug were colored with Copics and the little flowers were colored with Wink of Stella Pens.  I also added a layer of Clear Wink of Stella to the butterfly and ladybug.  Can't have enough shine now, can you?!

So when you open the little flaps you see a little scene with oh-so-cute owls. I didn't have a tree stamp that would work (yes, I have tree stamps but none that would work for this scene) so I drew the little tree limb.

I love the little owls...they are actually two separate stamps...and they are looking at each other.  Too cute!

I used some Distress Ink to sponge around them to get a bit of a sky look....and I added Wink of Stella to nearly everything!

Lastly, layered the scene and windows on top of a piece of green cardstock and mounted onto white Neenah for a finished A2 sized card.

This took a while to do...but I'm not giving up on it...want to play with these little windows and flaps again soon! Maybe today! ;)

Happy Crafting!

Sunday, November 8, 2015

Happy Birthday Shaker Card

Shaker cards have seen a resurgence in popularity in the last year or so.  I can remember making them (and shaker embellishments for scrapbooking) many years ago.  We mostly filled the shaker cards with punched images whereas now the trend seems to be filling with sequins or beads or other glittery things...but the shaker part remains virtually the same. 

I always enjoyed them but haven't made one in a few years, I think.  They are always fun to make and fun to receive.

Yesterday was the Grand Opening for Impressive Ideas...a favorite stamp store in the metro Atlanta area.  Over Memorial Day weekend the former location burned to the ground.  We were all devastated....it was like losing a friend.  But the owners vowed to get it back up and running as soon as they could and they did it! They opened less than 6 months after the fire and moved into an even bigger and better space.  It looks absolutely awesome and before I knew it I had several must have items in my basket!

One of those items was a Die-Namics Birthday Celebration die which is a round birthday sentiment and PERFECT for making a shaker card.  It cut beautifully....and was really so easy to make.  I love the stitched circle. I also used a stitches die from Lawn Fawn to do the stitched edges on the top and bottom of the front. I quickly made 3 using some birthday paper from Paper Studio.

Here is the first one I did:

It was so fast I quickly (read: in less than an hour) whipped out 2 more!

I think they are festive and fun and I already have two ready to go in tomorrow's mail.  I figure I just about paid for the die! LOL...You know...an American Greetings birthday card like this would run $4 or so....so 3 at $4 means I saved $12! HAHA!  Only a few more to go and the die will have paid for itself!
Seriously!  That's my justification and I'm sticking to it!

Happy Crafting!


Friday, November 6, 2015

Share Handmade Kindness

Well, my goodness, my attempts to start blogging again have met with a huge F in effort! I have been creating...just not sharing. Some of the things I've made are NOT shareable (LOL!...U G L Y!) but I do have a few things that have been fun and have worked out (and yes.I.copied.most.of.them from the superstars!).

But today I wanted to bring up the campaign Jennifer McGuire is spearheading at her blog which is "Share Handmade Kindness".  We all need a bit more kindness in the world, don't we?  With handmade gifts we can share that kindness and, perhaps, bring a smile to someone's face.

You can read about the campaign and challenge HERE.

I have been sending out a few cards lately and have had more fun decorating the envelopes than making the cards.  I've done some watercolor washes ala' Kristina Werner which have been well received.

And then I decided to decorate this envelope with a little scene done with some older Hero Arts stamps I have.  My friend, Amy, moved into a new house recently and I wanted to send her a congratulations card.

So here it is:

I blurred her address for obvious reasons.  Can't have ya'all stalking her!

Anyway, a little fancy hand lettering made it even more fun.

I used the Zig Clean Brush Pens which I recently purchased and absolutely love.  They are so much fun and so easy to work with and I am a huge fan of the watercolor look!

We have had so much rain lately that I slipped this envelope into a clear envelope for mailing.  I certainly didn't want my work to wash out!

And that is it for today...a little kindness is on its way to Amy!

Happy Crafting and spread the kindness!

And I am linking this to Jennifer's blog HERE.

Friday, October 2, 2015

Where in the World Has Susan Been?!

It has been over 3 months since my last blog post.  Wowza...time does pass when one is having fun...it also just passes when one is extremely busy...and it does also pass when one needs to get some mojo back! HAHA!

So...what has been happening with me?  Well, the biggest thing that took me away from blogging was an AROUND THE WORLD trip my husband and I went on mid June.  It was a 6 week trip that literally took us around the world. It was an absolutely amazing experience...definitely once in a lifetime sort of thing.

I blogged my entire trip on a nifty little travel app and it is available for you to view HERELots of fun stories and pictures.  If you do any traveling I certainly recommend the app, too...it's called Travel Pod and is free through iTunes...I'm not sure if there is a droid version but most likely there is.

We left Atlanta mid June 17 and headed towards Rio de Janiero, Brazil.
Then to Paris, France.
On to Bangkok Thailand.
A few days in Singapore.
More time in Hong Kong.
Back to Bangkok, Thailand.
To Seoul, Korea.
Over to Tokyo, Japan.
And lastly to Sydney, Australia before heading to Los Angeles (a 14 hour flight) and ultimately back to Atlanta.

Not including North America....we made 4 continents and 8 major cities.  What a trip!

Amazing trip...

We got back home and not long after we went to the beach for a week for our annual family vacation. It was also wonderful...kids and grandkids...it was a fun time to all be together.

So needless to say...my craft room has been a bit neglected.  I just didn't make the time to do much crafting! But I've started working on a few things since I got back. so thought I'd share a few simple cards today.

Here we go both done with the Simon Says Stamp Card Kit for the Month for July:


I stamped the little wave onto Vellum with Versamark Ink and heat embossed it with white powder and then cut it out.  I did the same with the little sailboat and colored it in with some Tim Holtz Distress Markers.  Simple and easy...and flat! LOL!

The second card was done with the same stamp set which is so darned cute! I love the sailing theme!
So very summery!
I distressed the edges of the background paper.  I also stamped the life saver image and then scanned it and cut it out with my Silhouette. More on the PixScan cuts later.
The mat was done with a Simon Says Stamp stitched metal die.

So....I am BACK! Hoping all is well for you...and thanks to those of you who encouraged me to get back on the blogging wagon!

Happy Crafting!


Monday, June 15, 2015

Crafting Innovators: The Crafty Lemon

A very special friend of mine (one of my daughter's BFF from high school) is quite the crafty person. Amanda (yes, she shares the same name my daughter has...and yes, that has created some confusion over the years! HA!) has left her job recently in corporate America to pursue her passion and dream.  A year or so ago she founded a craft club in her neighborhood where the neighbor kids could come for crafting and to also learn about other things (like nutrition) in a fun way.

Amanda has created a line of natural health and beauty products which funds her craft club(s).Her venture is called The Crafty Lemon and you can see it HERE  and shop HERE.  Cool idea! Amanda sells a great line of lip balms made with good and wholesome ingredients.  Why would you put icky chemicals on your lips like some of the big name lip balm companies when you can use natural and organic products.  A. NO. Brainer.

Anyway she dropped by today to give me a sample which I'm going to take on an upcoming trip!  I just tried it out and my lips feel like silk! SMOOCH!

And, Amanda...being the crafty thing she is cut this packaging with her Silhouette:
 It perfectly holds the lip balm and she has successfully used it as a mailer!
There are three sides to it...here are the other two:

When opened the lip balm was wrapped in matching blue tissue paper.
Once opened you see the lip balm.  The label has art work which was done by kids of the craft club.
Isn't that cute?
I think what Amanda is trying to do is awesome.  She would like to set up chapters in other neighborhoods...she wants many children to have the opportunity to craft and express themselves through creativity.

This is all so wonderful I thought I needed to share!

Happy Crafting!

Saturday, June 13, 2015

A Blast from the Past

As I was cleaning up some scraps of paper the other day I came across this embossed vellum card front which took me back to a time long gone.  This era was the "Susan Loves Embossing Era" and was pre-Cuttlebug, Big Shot, Vagabond, Caliber Eras (almost back to the Ice Age!).  This era was characterized by brass embossing templates, styluses and light boxes and all of the embossing was done by hand.  And way back when...my favorite place for the brass plates and embossing supplies was Lasting Impressions.  Oh, how I loved those templates.

Now I know that these templates can be used in our fancy schmancy embossing machines but I just haven't done that yet.  I'll have to try because, of course, I never got rid of my beloved templates.

By the way...way back when Lasting Impressions also had computer software where you could print out a design and then put it on your light box and emboss.  That's exactly what I did here on the card front I mentioned above:
 I printed out the design on vellum and then put it on my light box and did the embossing.  You can't see it here much but it is embossed.  So it was fun for me to use something I made a very long time ago....I was sort of happy to come across this!

Happy Crafting!

Friday, June 12, 2015

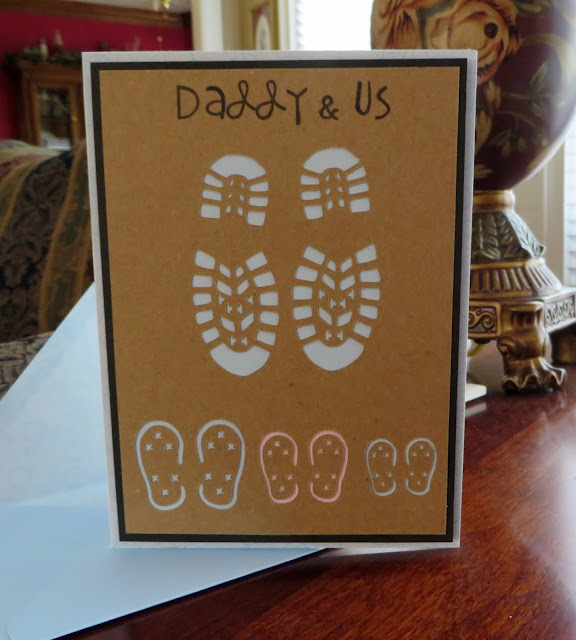
Daddy and Us

I came across a very cute little file in the Silhouette online store.  It is actually a card designed by Suzanne Cannon and looked like this:
I thought it was really cute...with the cutout shoes and decided to personalize it for my son in law from his 3 little ones.  I changed the orientation of the card and added in two more pairs of shoes sized to represent my grandchildren.  I backed with blue and pink paper (2 boys, 1 girl, of course!).
After it was done I decided it was just too "meh" for me so cut the panel and used it as a card front on a mat and base.  It just needed a little more pizzazz for me.  Instead of cutting out Daddy and Me...or Daddy and Us in this case I stamped with some Paper Smooches stamps I had on hand.
The card is approximately 6.5 by 5 (or something like that) so when done I made an envelope with the We R Memory Makers Envelope Punch Board.
My daughter will get her three to "sign" their names....and will give it to him for Father's Day which is coming soon. 
That's it for today.
Happy Crafting!

Friday, June 5, 2015

Another Happy Birthday Card!

My daughter celebrated her birthday this week.  I'm not even going to mention how old she is! It's scary....but I do keep reminding myself I had her when I was 12 so I can't be as old as it must look to others! LOL!

Anyway, I made this card with the Simon Says Stamp Card Kit for June which I adore! It has the really coolest little metal die with it that says "Smile" and is inside a circle.  So very wonderful!  I used it to make a little shaker element.  The stitched circle is also from Simon Says Stamp.

Here is the card kit which, of course, is already sold out...but individual elements like the cute die and stamp set are still available:
I also love the pretty and cheerful Doodlebug papers.

Here is my card:
 Such a fun and happy card, I think.  I love those bright colors!

Here is a closer look to the shaker part:

And that's it for today!
Hope everyone enjoys beautiful sunshine today...can take time to SMILE and keep on crafting!

Monday, June 1, 2015

Birthdays, Birthdays!

This is a week for birthdays for us. Tomorrow my sweet little, adorable and a little goofy granddaughter turns 4.  These last 4 years have gone by so quickly...scary how the time flies!
I made her this little card with a Penny Black stamp set called "Mimi in Paris".  Taylor loves animals so I thought she'd like this little one with a puppy on it.

I stamped the images on white cardstock and then masked them so that I could use some distress inks to make the background. I also punched some clouds out with masking tape and used those on my sky.

I used mostly my new Chameleon pens to color with a little Copic coloring thrown in.  I find the Copics challenging to get nice blending like the pros but the Chameleons which are supposed to be much easier to use were not for me! LOL! I need lots of practice.  But I don't think Taylor will notice my less than perfect coloring.
And then I used some liquid applique for the puffy stuff on the little poodle.  I finished off with some clear Wink of Stella to add a little fun and glittery sheen.

Happy Birthday, Taylor!
And Happy Crafting!

Oh, and I entered this in the Simon Says Stamp Anything Goes Challenge which you can read about HERE.

Friday, May 29, 2015

Saturday, May 16, 2015

May All Your Dreams....

I have finally created a card that would be appropriate for the male species! Well, I've done masculine cards before but went "meh" when I finished them. This one I actually love.  I was at my local stamp store recently...the store features fabulous sample cards throughout and I came across one that incorporated wire and just loved it.  So  bought the stamp set...Rising Stars by Paper Smooches along with the matching dies and set to work creating my own version.

Funny story about wire...for the scrapbookers out there...remember when it was so popular to put it on scrapbook pages?  Yep, I had all the tools and all the wire and it was a lot of fun.  That box of wire supplies has sat unused for many years!  Ok, now to the funny story.  Over 12 years ago (I was living in another house) I was working on a scrapbook page in my little scrapbook nook in my bedroom.  I was using said wire.  I looked down and wondered where some red ink came from as I was not using pens or anything that had red ink.  Well, lo and behold...I realized I was BLEEDING on my scrapbook page! I had apparently pricked myself with the wire and was dripping blood on my page.  Well, I had put a lot of time into that page and was NOT going to redo it.  So I wiped off what I could and then told my husband that if he ever needed a DNA sample to go to the scrapbook from 2002 that had the fall trip to Las Vegas in it!  LOL!

Anyway, on to my wire card and thankfully, I did NOT bleed on these creations!

I made this one with Stampin' Up papers and inks, a My Finest Thing border die and some LifeCrafts circle dies:
I also used a Recollections punch I had.  Love, love, love how this turned out.  Here's a closeup of the stars and wire works:
I made this for a friend's son who is graduating from high school but once I finished it I thought...now why didn't I do it in his school colors???
So I decided to make another one in his school colors of red, white and blue....I added a little yellow because it just needed something else:
I used different Fiskars border punches but the card design is the same.  I had such fun doing this!
I love this stamp set.
And the dies:

And, of course, these cards would be perfectly lovely for the feminine species too! :)  No gender specificity here!

Well, that's it for today...off to do other wild and exciting things!

Happy Crafting!

Thursday, May 14, 2015

Happy Birthday to You!

Can it be???! A second post for today?  I felt sort of guilty about just posting about Evernote and how great the program is for keeping track of your stash so I decided to actually post a recent card I made. Evernote is great...but that whole post was sort of blah...so here's to a little non-blah, I hope.

I recently bought the Kuretake Gansai Tambi watercolors. I had seen so many of my favorite bloggers using them that I just had to get a set of my own.  They had been on my wish list for a long time so I finally bit the bullet and picked them up off Amazon.  How wonderful and vibrant they are! I have enjoyed playing with them a bit recently.

I made this card using the fabulous (and older) Secret Garden set from Stampin' Up.  I also used a die from Lawn Fawn for the sentiment.  Before coloring in the flower I heat embossed the stamped image with white embossing powder.


I swear the watercoloring looks better with prettier shading in real life.  Trust me! It couldn't be that I don't know what I'm doing...LOL!

Happy  Crafting!


Evernote: Or How NOT to Buy the Same Supples Again

My good friend, Cyndi, and I are always giving each other duplicate crafty stuff.  It's sad.  We buy...and buy again...and then realize we have just spent our money buying the same thing twice.  Sad.  Not really...because we both benefit from each other's boo-boos.  But sometimes it is a bit aggravating! You'd think we'd remember but when you have 363 stamp sets, 281 ink pads, 84 Copic pens, etc. (Ok, slight exaggeration...but not by much), etc...it happens.  You see something cute or you must have without realizing it's already in your stash. Then as you are putting your cute new item away you find the same item!  It happens...

A while back I had seen a post about how another blogger was using Evernote to keep an inventory of her files. I read about it HERE on the A Vegas Girl at Heart blog.  I loved the idea of setting something up I could access on my laptop, my iPad or my iPhone.  So despite where I am I should be able to see what all I have!

I thought I had posted about this system here on my blog at one time but I have searched and searched and can't find it so I'm starting anew.  This may be of absolutely NON interest to many of you...so just skip this post if you're not. ;)

Evernote is a great free organizational tool program which you can download HERE.  You can store documents, lists, recipes...etc...and can sync it across your appliances so that you can see the info anywhere. I do have some recipes loaded in...generally new ones I want to try...I just plop them in Evernote and then when I'm at the grocery store I can pull up the recipe to see what ingredients I might need.

(Note: Evernote is basically free but there is a limit to the amount of data that can be uploaded monthly and if you exceed this you can buy an upgrade.  I've never exceeded the limit so have been able to utilize this FREE resource.) 

But really...for this post I'm going to talk about storing an inventory of my scrapbooking/crafting things.  My system is similar to A Vegas Girl's.

After installing Evernote on your computer you will need to set up an account.  And of course you will need to have a password.  LOL...now I have a password program that keeps track of all my passwords because I can't remember nothin'!  But that's a whole 'nother story!

I have the Evernote icon on my start tray at the bottom of my computer so I just click on that to open my program.  It will open to something like this:


Oh, and see the little elephant head icon in the system tray at the bottom? That's just a quick way to open Evernote.

As you can see "notebooks" can be created to store your lists, inventories, recipes, etc. in.  I have notebooks for several things as you can see but today we will focus on my ever growing list of paper crafting supplies.  To create a notebook is simple...go to File>New Notebook.  A pop up window will appear and you will name your notebook.  If you want to be able to sync it across appliances click on "Synchronized Notebook".  If you want it only on your computer then click "local notebook".  If you are handy with keyboard shortcuts you can also right click in the area where notebooks are to get the pop up window to create a new notebook. 
If I click on my paper crafting notebook I will see the following screen:

This gives you an idea of how I have my supplies organized on Evernote.

If you click on "Stamps" you will then get into the "meat" of the notebook...where are my goodies are stored!
And then you will see something like this:

And above you can see the information I include with my stamps sets...namely, manufacturer, name of set, the style (clear or cling or wood) and roughly the number of stamps included in the set.
I always include a photo of the stamp set which I snag from the web...most images can just be dragged and dropped in.  Easy Peasy.  Another feature that is just oh so great is that you can tag the item for later searches.  Above the photo you can see my tags...they are birthday, floral, get well, rose and thank you.  THIS IS SO HELPFUL! Once tagged I can then search for the sets that say "thank you", for example and pull up those sets without having to look through all my boxes of stamps! This is a great feature! Of course, it's only as good as the tags you create.

If I wanted to add in a new set I would go to "New Note" near the top of the screen.  Once I have a blank page I would create a name (I always start with the manufacturer name) and then the name of the set.
I drag and drop the photo and then list in the other specifics about the set I like to include...and lastly set up my tags.
It's so easy.
It did take a good bit of time when I first set it up because I had a ton of sets to enter but once I got them in I, now, just have to add in newly acquired sets.

I also have notebooks for dies that I have set up in a similar manner.

I have a list for my Distress Inks which is in the form of a list:


You can create lists or notebooks for anything you want to keep track of.

Once you have your info loaded in you can click on "Sync" on the top left and this will sync your information between your appliances.  Very handy for when you are out shopping and can't remember anything! LOL!

This is what the screen for stamps looks like on my iPhone:


And if I click on a stamp set (in this case "Simon Says Stamp Congrat..." I would see this:
And of course, even on my iPhone or iPad I can use the search function.

I even have a 324 page document in pdf with the rules of tennis. You just never know when someone might try to unknowingly try to cheat you!...LOL...I can whip out my phone...got to Evernote and pull up the document as a resource!

Because, of course, my brain can't remember every single rule... It also keeps me in check from unknowingly cheating others!

Evernote is also available to Droid users.

I know I have not covered this awesome program and its capabilities but maybe this is a start for you!

And thanks to Melissa at A Vegas Girl at Heart for sharing this info with me!

Happy Crafting and Happy Inventorying!  


Monday, May 4, 2015

And a Happy Birthday to Me!

Yesterday was my birthday...I turned a big ol' 6-oh.  I am no ashamed at all.  My mother grew up in the era where "ladies" did not discuss their ages. Not me...I'm proud I can start getting senior citizen discounts at various places! No shame in that!

I had a wonderful day including a 5 1/2 mile hike at Stone Mountain Park.  The weather was perfect...bright sunshine, warm weather...low HUMIDITY! Perfect for a wonderful walk with my #1 daughter.

Here we are at the beginning of the trail:
We had a great time...I love hiking and the Cherokee Trail at Stone Mountain is a wonderful trail that makes you think you are out in the wilderness at some parts.
Some of the views were quite lovely:
This photo was straight out of the iPhone...could be edited for some improvements, I'm sure....but isn't that reflection just wonderful?

After our big walk we went out to lunch where my son surprised me:
It was such a special treat to spend an hour or two with these two. They decided it would be fun to just have some time to Mom themselves and I loved the idea.  We will have a big get together with the spouses in another week or two. :)
Lastly I did go to my daughter's in the evening for a steak dinner.  She also prepared my favorite cake...German Chocolate and I had a little help blowing out the candles!
 Life is grand, isn't it?

And now on to my card share for today...a simple watercolor card involving the smooshing technique which Laura Bassen describes so well in her video HERE.  It is a highly technical and difficult technique. (not...)

The sentiment at the bottom is from a rub on set that was included with the Simon Says Stamp Kit for April.  Perfect for the my highly technical and difficult watercoloring.  True (the part about the sentiment, anyway.).

The striped tape is Washi....love it.

Her is a closer look at the sentiment:
It really is all lovely in person than on this dream like website.  LOL!

And that's it for today...hope you all are having a tremendous day...don't forget to stop and smell the flowers...and spend a little time daydreaming, too!

Happy Crafting!

Wednesday, April 29, 2015

Birthdays Keep Rolling!

I got into a "thing" making birthday cards the other day using the stamp set included with the Simon Says Stamp Card Kit for April.  I make a lot of cards but don't seem to have enough birthday cards on hand and am always struggling to make a card at the last minute. So now I have a bit of a stash! :) I like having a stash. Really.  Now I just need to remember to go to my stash and actually USE them!

And not hoard them.

Anyway, here is the card I wanted to share today:
This was inspired (ok, copied) by a card from Shari Carroll.  Mine is a bit different.  I used different colored inks. LOL! 
I did use the incredible MISTI to line up my stamps so that I could easily duplicate the card and yes, 3 were whipped up in no time at all.
The blue and yellow inks are Memento Luxe.  The Make a Wish sentiment was stamped with VersaMark and embossed with Zing gold embossing powder.
I love the Bazzill kraft cardstock with the gold foil on it.
Fabulous card kit.  It's a keeper!

Happy Crafting!

Monday, April 27, 2015

More Birthday Cards with SSS

This is a shameless copy of a card by Laura Basson for Simon Says Stamp using the stamp set from the April Simon Says Stamp Card Kit.  I love how she slits her cards to reveal something fun or interesting underneath. 
Here is my version:
I used Memento Luxe pigment inks...oooh la la...so bright and fun.....and the sentiment was inked with VersaFine onyx ink and embossed with clear embossing powder to make it a bit shiny.

I used MISTI to stamp the sentiment since I made several cards.

Easy and fun!

And that's it for today...a quick post here!
Happy Crafting!!!


Sunday, April 26, 2015

A Very Ombre' Birthday!

I treated myself to some time in my craft room yesterday after doing some much needed housework! Yep, I let it slide... LOL! But yesterday was dreary here...not a great day to be outside so a perfect day (not!...is there ever a perfect day) to do housework! Dusting, vacuuming, bathroom cleaning...ugh.  Actually, it's not really ugh to me.  Once I get going the OCD in me kicks in and I actually enjoy it (to a certain extent).  I plug in my iPod...and since I was home alone I could sing at the top of my lungs...Tom Petty, the Beatles, Katy Perry, OutKast, the Eagles, Usher, ...LOL...yep, my music tastes are eclectic!
Anyway, I lucked into finding the new Hero Arts Ombre' inks at Hobby Lobby.  Yay for that and yay for 40% off coupons. So many of my favorite online vendors have been sold out of them so this was a huge find for me as I'd been eying them since they came out.
I used the stamp set from the Simon Says Stamp Card Kit for April.    
What a great birthday set!
I used the Ombre' inks to stamp the balloons...added some string with a black pen and some washi tape.  And that big bold sentiment was embossed with Zing gold embossing powder.  And no...I did not burn anything!

 You can see the embossing better here:

I enjoyed using the inks and I think they are a little more vibrant than they show up in the photos.  I like the variations and gradients you get with them.  Fun to use!

I added a little washi tape that was included with the kit and used a Corner Chomper to add a little more interest to the corners...and that was it!

Happy Crafting!

Sunday, April 19, 2015

Beyond the Sea....

I have been oh-so-lucky to spend part of my winter at the beach for the last three years.  I have a wonderful friend who has a house in Laguna Beach, FL just west of Panama City Beach. Oh, how I love the white sands and emerald green water of the Gulf. It is truly a happy place for me and I love being down there in the winter. It's not tropical in the Florida Panhandle in the winter...it's not sunning yourself on the beach kind of weather but I love the cool crisp air and the sound of the waves. And the winter sunsets are so spectacular! Happy. Place.

Anyway, I always make a few cards for my friend as a little additional thank you and they are done with a beachy or ocean theme.  This is what I came up with for this year:
I made several different versions before setting on this one....I tried different backgrounds...different ways to do the little sea turtle...etc.  But was pretty happy with this fun and cheerful card when it all came together.
I used Lawn Fawn's Critters Under the Sea for the turtle and coral. They were colored with Copics and cut out to adhere to the little water scene which was done with Ranger Distress Inks and blending tools.  I used a die from Paper Smooches called Stitched Flourishes to do the little flourish behind the turtle...I thought it made it look like there was movement and of course, there is...the turtle is swimming! LOL! And the little turtle was popped up on some foam tape to give a tad of dimension.  Since these will be mailed, I presume, I didn't want too much bulk.
I used some circle dies from Lifestyle Crafts and cut the scalloped circle from a Spellbinder die onto some orange paper which I embossed with a Cuttlebug embossing folder called "Tiny Bubbles".
I used a sentiment from an old stamp set that a friend gave me.  There is no name on the set so I don't know who the manufacturer is and Google did not help me! I set the stamp up on my friend, MISTI which made stamping the image in the very same place (since I made multiple cards!) very easy!
I brushed some clear Wink of Stella glitter shimmer over the turtle and the coral and added some glossy accents for "bubbles".
I think my friend will like them.  I would love to receive one of these! :)
They make me want to head south and back to the beach!
And that is it for today...it is wet and gloomy here in Atlanta. We have had so much rain recently but it certainly has helped with all of the pollen!

Happy Crafting!