Sunday, April 28, 2013

Happy Mother's Day!

Here is another card made with the Simon Says Stamp May Card Kit.  I love how it turned out....I was inspired by a card which I thought was made by Kristina Werner but I've just spent 15 minutes searching for it and can't find it.  The card was similar with a few of my own touches, though.

The background was embossed with the Cuttlebug Swiss Dots embossing folder. 

Here it is:
There is a little envelope on the front and I have a tag inserted in it. 
Here is the tag pulled out a little ways...I heat embossed three roses from the stamp set included in the kit and on the bottom right which you can't see....is a little heat embossed sentiment.
I also used one of the little chipboard hearts that came with the kit and put some white Enamel Accents on it.

I think the recipient will love it!

:)

I am entering this in the Simon Says Stamp Challenge: Anything Goes.

Happy Crafting to you!  It's rainy here in Atlanta today and I'm hoping to get into my craft room and work on my Project Life!


Saturday, April 27, 2013

Congrats!

We are heading to a wedding tonight.  My dear friend's son is getting married to, literally, the girl next door.  OK, she doesn't really live next door but she does live in their neighborhood!

I made this card for the bride and groom.  I used papers from the May Simon Says Stamp May kit and Hero Arts stamps as well as a couple of Spellbinders dies.  The edger is from Papertrey Ink.

I love the vellum window and the hearts with the Glossy Accents on them.
I lined the inside with a printed paper and you can see it through the vellum.  So soft and pretty, I think!

That's it for today....need to go get ready for the wedding!

I'm entering this in the Simon Says Stamp Challenge: Anything Goes.

Happy Crafting!

Friday, April 26, 2013

Project Life: Week 15

I got a tad behind on my Project Life during the Great Scrapbook Room Clean Out but I'm catching back up.  I'm just a week behind now and that feels good!

Here is Week 15.  So easy...so fast...again, the longest part of the process is planning which pictures to have printed.  Once I figure out sizes and what goes where the pages come together pretty quickly.

This is probably record fast because I didn't do a whole lot extra....these cards are from an Echo Park  Photo Freedom kit I had...I added some washi tape here and there and some journaling and that was about it.  So simple and so easy....and best of all...so fast!  I'm good with that.  Some weeks I may want to play a bit more and make some cuter embellishments and journaling and filler cards but some weeks I want to just get it done.  I don't think this is any less cute...I'm good with these Project Life type journaling cards and embellishments.  It makes life so easy!

Anyway...oh yes, where was I?  Getting ready to show my pages.  Here they are with the left side first:

I added a little stamping on the left journaling card with the arrow.  So cute.  The "You're the best" thought bubble came with the Photo Freedom kit.

Here is the right side:
I did put some sticker letters on the bottom left photo...also from the Echo Park Photo Freedom Kit.


I added a few letter stickers from some very, very old letters stickers I came across in my room redo.  The were perfect for this page, I thought!

And that's it for today,  my friends!

Happy Crafting!

Thursday, April 25, 2013

Hello, Spring!

I love the spring!  I love all the flowering bulbs and trees.  I do not love the pollen.  Atlanta is knee deep in yellow pine pollen right now but if you can look through the yellow haze of the pollen you will see dogwoods, cherry trees, narcissus, wisteria, azaleas and more!  There is such beautiful color here this time of year.

I did the following card with the Simon Says Stamp March card kit once again.  What a great kit!
Unfortunately, the kit is sold out and I don't know if they will sell it again.
Here is what the kit looked like, though.


I've made 2 cards with it and have tons and tons of supplies left.  I can't wait to use those straws!  Love it...and it is a great value!!!
All supplies on this card came from this kit with the exception of white ink from Close to My Heart and some Hero Arts and Stampin' Up inks.  I also did use a little Glossy Accents on the center of the flower.


I was inspired by Shari Carroll's card HERE.  What caught my attention was the little Polaroid looking frame.  So cute!

I am entering this in the Simon Says Stamp Challenge: Anything Goes.

And that's it for today!

Happy Crafting!

Wednesday, April 24, 2013

Just Because....

Just Because...you are all amazing!

Well, I was a busy little crafting gal last night.  Not only did I finish Week 15 of my Project Life which I'll show another day but I made 2 cards with the March Simon Says Stamp Kit which is a FABULOUS kit...I love, love, love this kit...so many beautiful papers and things in this kit and the stamp set is just wonderful!
Here is the card kit but I do think it's sold out...

So here is my card....lots of stamping here!  I used some Stampin' Up and Hero Arts inks as well as Versa Fine on the sentiment.  The SSS stamps give a nice crisp image.  Oh, and I was inspired by this card HERE.  I'm not sure who did it...perhaps Kristina Werner?
Anyway, here is my version:
 The little button, which you can see below is from Stampin' Up and has under it a little Itty Bitty stamp of a butterfly.  I used various gems and pearls I had from my stash on some of the flower centers.
I love the vibrant colors....and for me...this card is relatively flat so that is good and is one that might even get mailed! LOL!

I'm entering this in the Simon Says Stamp Challenge: Anything Goes.

Happy Crafting!

Monday, April 22, 2013

Project Life: Week 14 and Playing Catch Up!

After my huge craft room redo which you can see HERE, HERE, and HERE I am now trying to play catch up especially with my Project Life as I am a few weeks behind.  So yesterday I worked on Week 14 which was Easter week.  I've already done a full two page spread on Easter which you can see HERE so I just focused on the rest of the week for Week 14.

I chose to do very quickly this week....I used journaling cards and chipboard stickers from Recollections (Michaels brand).  I stapled a bit of rickrack on one card but that was about it for frou frou.  But I'm really happy with the end result as I can say "DONE!" and put it in my book!

Here is the left side:

Lots of pictures of the kiddos this past week.  Thanks to my daughter and Dropbox!

And the right side:


And I got my son's photos of his outing to the Atlanta Braves' first game of the season through Dropbox, too!  It is so helpful to me in aiding me to document my family life.  Yay, Dropbox!

I couldn't resist the moustache on my little fluffy girl:


Well, I'm off today to spend time with a very dear friend.  We will be heading to a winery for wine and cheese tasting.  Fun day.  Camera is ready!

And after my scrapbooking last night, my room stayed neat!  :)

Happy Crafting!!!

Saturday, April 20, 2013

Finished! Termine'! Fertig! Acabado! 完成した! เสร็จ!

 I am finally finished with my room!  It is clean...it is neat...it is weeded out...there has been major purging...it is organized....I know what I have...

Makes me almost want to go in and create!  But now I'm afraid because I don't want to mess it up! LOL!!!

So now I will give you the full tour of my "studio"...lots of pictures here so bear with me.

I don't know why I feel the need to put studio in quotes.  I mean...it is a studio according to Webster's which states a studio is  "A room where an artist, photographer, sculptor, etc., works." I am an "etc." and I work in my room so maybe it is a studio after all.  It just sounds so much hoity toitier than just plain old "crafting room".

Anyway...doesn't  matter what you call it...I am lucky to have a nice big room.  This is also a problem because it just means you have more space to junk it up. Which I did a great job doing!  But now that I have pretty much been through every nook and cranny I am once again aware of the things I have.

That's a good thing...know what you have.

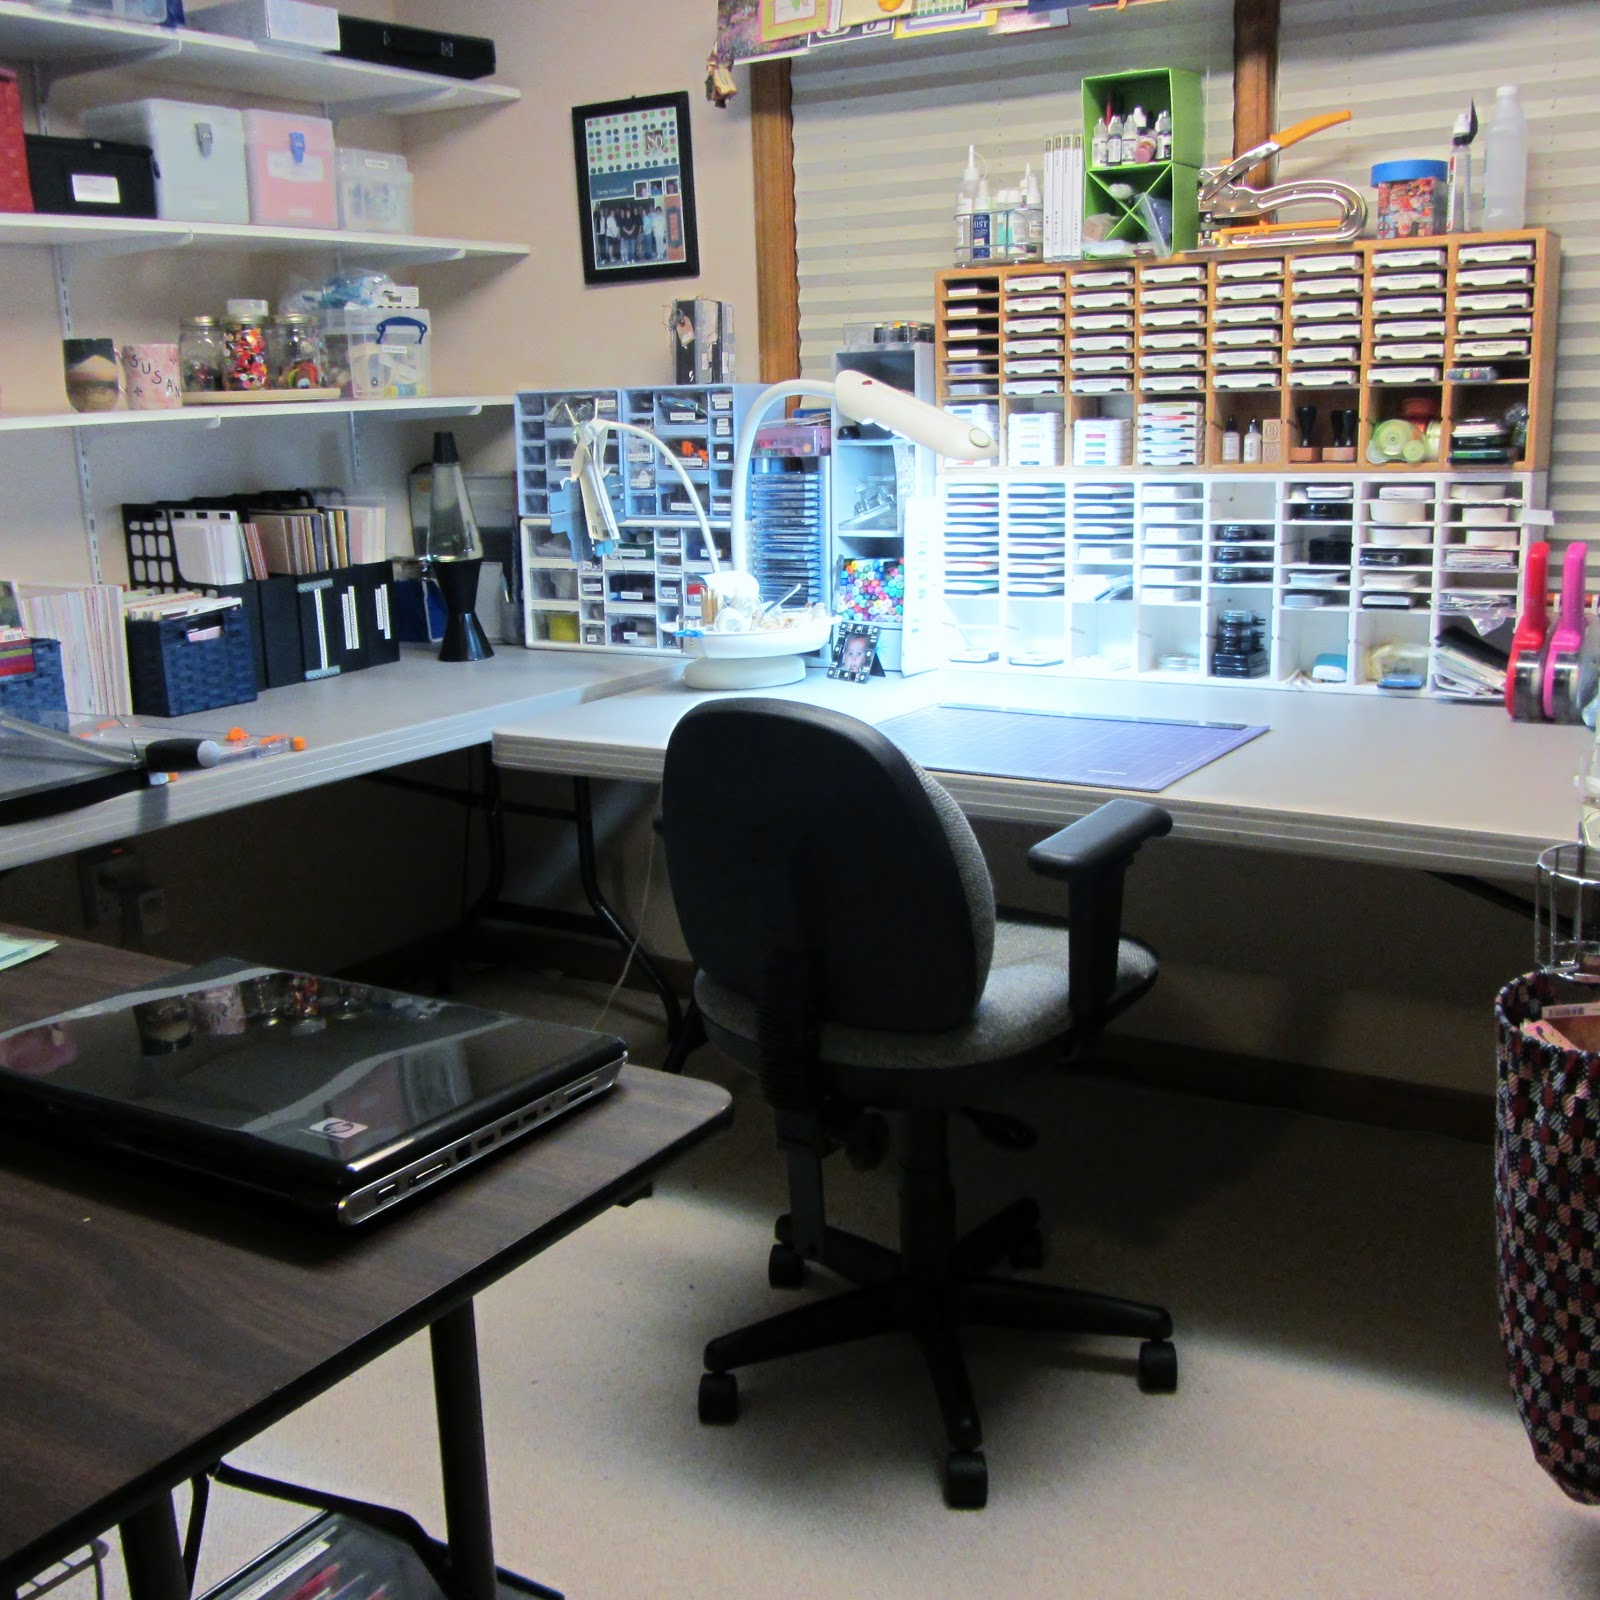
Our tour begins as you walk into my room.  This is what I see when I enter:
My work area is over to the far right where you can see my ink pads.
Below is from the same spot...just face on to the wall across the room.  You can see my heater on the floor.  It gets way too cold for me in my room.  I have to heat it even when the temps are in the 90s outside.  Otherwise I will get frostbite.  I love my heater....it has a timer on it so it goes off automatically and it is totally safe.  (I hope.)


I have very little wall space in my room....there are 3 doors and a big window so not much room for hanging things.  Well, we hung a bunch of shelves but every inch of wall space is just about taken except for this little while where  I have YET MORE RIBBON!  I have one of those Clip it Up ribbon holders which holds my spooled ribbon and then below it is the side to a baby bed that I have cut pieces of ribbon on.  It looks way more impressive in real life than it does in this photo.  I promise you.  A story....many years ago my friend Holly and I decided to buy all the grosgrain ribbon that Stampin' Up had...cut it into pieces, bag it up and resell it for profit.  We made $1, I think.  LOL....and we both ended up with a boat load of grosgrain ribbon! LOL!!!  So I've taken all mine apart and hung it over the slats of the baby bed.  Ingenious...huh?


I use an old microwave cart (I love repurposing!) as my embossing station.  I have my Big Shot set up on it.   Works well for me....  On the shelves below are my Becky Higgins Project Life kits.


In one of the drawers in my cube to the left I keep my embossing folders.  They are all in their own little file area and make it easy for me to locate the one I want to use.
Below that is a drawer with most of my Spellbinder dies.  I need a better way to organize these.  I've tried CD holders and leaving them in their packaging.  I need to still work on this.  I just want a way to put them in this drawer so I can find them! Any ideas?  I guess I could cut magnet sheets to fit the drawer and put tabs on them.  Hmmmm....maybe I will try that....

I have two 4 foot tables pushed together for my sewing machine, my Silhouette and my laptop.  I kind of have a u-shaped work area with a swivel chair so I can easily get behind me to my Silhouette.

Hurricane Debbie who helped me reorganize my room had this great idea to put all my paper kits or coordinating papers in either page protectors or Zip Loc bags.  They had been in all kinds of locations in my room and I had no idea what all I had!  Now I can just look through these easily and quickly and pull out what I want to use!  THANKS, DEBBIE!!!

 See?  Isn't that Close to My Heart paper pretty?  Forgot I had it.  Don't even remember buying it!  LOL!

That blue basket bin sits right next to my paper stacks which I shared yesterday.  On top of the paper stacks are a couple of plastic containers with some new things I still want to use...some stamps, dies, kits, etc.


Under the table with my laptop and Silhouette I have a rack shelving unit with some containers with pens, Stickles, paints, etc.  My label maker definitely got a work out today!


This is what I see when I face forward at my table:

This is what I see when I look to the right:


And this is what I see when I look to the left:


And this is what I see if I swivel my chair to get to my laptop and Silhouette:


I bought these many years ago at Target....It's just those little drawer units you get in the tool section.  It has always worked well for me...it holds Qtips, pins, Fray Check, needles, my embossing buddy, extra trimmer blades, etc.

And lastly....this little guy keeps me company (the photo got a bit of glare on it...but you get the idea... :)).


I really can't wait to do some creating in here again....but I just didn't have the energy to mess it up today.  I think maybe tomorrow....

Ack! I just realized I didn't show you where I keep my embossing powders and distress inks!  Maybe tomorrow. ;)

Happy Crafting to you!

Friday, April 19, 2013

Bigger Than Expected!

My whole craft room/studio redo has required so much more time and effort than I ever dreamed it would!  Yikes!!! And I'm still not done!  But one thing I've learned is that I can only do it for about an hour or so a day and then I gotta get outta there!  HAHA!

But it really is getting close to being done and I think I will really like my new organizational systems.  At least for now.  One thing I've noticed is that paper crafters generally love to organize and reorganize. What's up with that?!

The other day I posted "Taking Shape" and showed a picture of my nice cleaned off table.  Then Hurricane Debbie showed up and my room was again torn up and destroyed.  Debbie is a good friend of mine who is fabulous at organizing and she saw a great need to redo just about everything I'd done.  LOL!  So...for the next 5 days my table top was never to be seen.  But it has all been worth it and I'll share my progress to date.  Here it is in bits and pieces.

First of all....I love paper stacks although I am not buying 12x12 any longer (well, except for the cute one I got half priced at Michaels the other day. LOL!).  I do love the stacks I have though and had them in a basket crate thing but bought this 56 qt Sterlite container for about $7 the other day.  It's too heavy to lift but I don't plan for it to go anywhere anyway!  It sits under the table where my paper trimmers are.  I write the name of the stack and manufacturer on the binding with a Sharpie so that I can more easily pull out the one I want.

This container works well for these stacks and with the top on no dust or other particles can get in.
They are a perfect fit!

Next is a cube that I got at Michaels a while back and I have my white, brown and black cardstock stored in it.  I kind of wanted all my cardstock in one place but for now it didn't quite work out that way....it is all about an arms length to the right and to the left of where I sit.  I may work on that arrangement but that is what it is for now.
On my cutting table I have this very cool heat embossing station that my friend, Cyndi, brought me back from Kansas City.  I am known as the Fire Starter with my heat gun so she is doing her best to try to keep me safe.  Thanks, Cyndi.  Come to think of it...since I got this stand I have not burned any carpet!
Ahem....I do love 6x6 and 8x8 paper pads and here is my collection of those.  Right within easy reach. I love having all these because I might make a card one day.  (Waving at you, Cyndi!)
I have my plain 8 1/2 by 11 cardstock in magazine holders...some are labeled if the paper is oh so special and some are not.
I store most of my buttons in mason jars on a Lazy  Susan (I always took issue with that term! LOL!).

To the right of where I sit I have some wire racks and cubes that I purchased at Target a long time ago...long before Michael's came out with the nice cube system.  I'm really trying to use what I have, though so this still works for me although sometimes I wish it looked a little better! LOL!
On the right is most of my ribbon (oh, yeah...I have way more on the other side of the room which I'll share in another post). and it's in boxes and labeled.  Debbie did a great job of organizing the boxes by color.  It's so easy to see what I have.
 There is also a box with Baker's twine as well as boxes for embroidery floss and fibers.
 And...at the very bottom I have my colored 12x12 cardstock as you can see here.
 In the middle section of the wire racks I have card packs and envelopes (yes, I have a lot...and now they are all in one place! Hallelujah!).  Below that are some Hero Arts cards and products.

I have this old Cropper Hopper file box that I am using for vellum, acetate, and other specialty type papers.

 Back over near my white, brown and black cardstock I have a large box that holds my paper scraps.

I try not to keep the smallest bits but these scraps are wonderful for die cutting and I go to my box often! They are all sorted by color.
 I store my punches in the over the door shoe racks.  I have tried other ways to store punches....boxes, drawers, etc...but this works well for me because I can easily see what I have.  I have another hanger over another door with my Martha Stewart punches.
 On my table I have this little storage thing I picked up at Goodwill for a dollar which holds my Copics and my Distress pens as well as my acrylic blocks.  To the left of the little storage thing is a CD rack with my Papertrey Ink stamps.
 And here is a picture of my work table again....and you can see my ink pad storage.  I  need to paint the top one at some time...some day...maybe... LOL!  I'm probably a little more about function than I am about looks so for now this is just fine! ;)
Still a good bit to do but if I put my mind to it I think I might be able to be done by tomorrow.  I'm having crafting withdrawal but I really need to finish up before I start any new projects.  That's the deal I've made with myself anyway! ;)

I hope you've enjoyed a little peek into my studio!

Happy Crafting.