Wednesday, April 29, 2015

Birthdays Keep Rolling!

I got into a "thing" making birthday cards the other day using the stamp set included with the Simon Says Stamp Card Kit for April.  I make a lot of cards but don't seem to have enough birthday cards on hand and am always struggling to make a card at the last minute. So now I have a bit of a stash! :) I like having a stash. Really.  Now I just need to remember to go to my stash and actually USE them!

And not hoard them.

Anyway, here is the card I wanted to share today:
This was inspired (ok, copied) by a card from Shari Carroll.  Mine is a bit different.  I used different colored inks. LOL! 
I did use the incredible MISTI to line up my stamps so that I could easily duplicate the card and yes, 3 were whipped up in no time at all.
The blue and yellow inks are Memento Luxe.  The Make a Wish sentiment was stamped with VersaMark and embossed with Zing gold embossing powder.
I love the Bazzill kraft cardstock with the gold foil on it.
Fabulous card kit.  It's a keeper!

Happy Crafting!

Monday, April 27, 2015

More Birthday Cards with SSS

This is a shameless copy of a card by Laura Basson for Simon Says Stamp using the stamp set from the April Simon Says Stamp Card Kit.  I love how she slits her cards to reveal something fun or interesting underneath. 
Here is my version:
I used Memento Luxe pigment inks...oooh la la...so bright and fun.....and the sentiment was inked with VersaFine onyx ink and embossed with clear embossing powder to make it a bit shiny.

I used MISTI to stamp the sentiment since I made several cards.

Easy and fun!

And that's it for today...a quick post here!
Happy Crafting!!!


Sunday, April 26, 2015

A Very Ombre' Birthday!

I treated myself to some time in my craft room yesterday after doing some much needed housework! Yep, I let it slide... LOL! But yesterday was dreary here...not a great day to be outside so a perfect day (not!...is there ever a perfect day) to do housework! Dusting, vacuuming, bathroom cleaning...ugh.  Actually, it's not really ugh to me.  Once I get going the OCD in me kicks in and I actually enjoy it (to a certain extent).  I plug in my iPod...and since I was home alone I could sing at the top of my lungs...Tom Petty, the Beatles, Katy Perry, OutKast, the Eagles, Usher, ...LOL...yep, my music tastes are eclectic!
Anyway, I lucked into finding the new Hero Arts Ombre' inks at Hobby Lobby.  Yay for that and yay for 40% off coupons. So many of my favorite online vendors have been sold out of them so this was a huge find for me as I'd been eying them since they came out.
I used the stamp set from the Simon Says Stamp Card Kit for April.    
What a great birthday set!
I used the Ombre' inks to stamp the balloons...added some string with a black pen and some washi tape.  And that big bold sentiment was embossed with Zing gold embossing powder.  And no...I did not burn anything!

 You can see the embossing better here:

I enjoyed using the inks and I think they are a little more vibrant than they show up in the photos.  I like the variations and gradients you get with them.  Fun to use!

I added a little washi tape that was included with the kit and used a Corner Chomper to add a little more interest to the corners...and that was it!

Happy Crafting!

Sunday, April 19, 2015

Beyond the Sea....

I have been oh-so-lucky to spend part of my winter at the beach for the last three years.  I have a wonderful friend who has a house in Laguna Beach, FL just west of Panama City Beach. Oh, how I love the white sands and emerald green water of the Gulf. It is truly a happy place for me and I love being down there in the winter. It's not tropical in the Florida Panhandle in the winter...it's not sunning yourself on the beach kind of weather but I love the cool crisp air and the sound of the waves. And the winter sunsets are so spectacular! Happy. Place.

Anyway, I always make a few cards for my friend as a little additional thank you and they are done with a beachy or ocean theme.  This is what I came up with for this year:
I made several different versions before setting on this one....I tried different backgrounds...different ways to do the little sea turtle...etc.  But was pretty happy with this fun and cheerful card when it all came together.
I used Lawn Fawn's Critters Under the Sea for the turtle and coral. They were colored with Copics and cut out to adhere to the little water scene which was done with Ranger Distress Inks and blending tools.  I used a die from Paper Smooches called Stitched Flourishes to do the little flourish behind the turtle...I thought it made it look like there was movement and of course, there is...the turtle is swimming! LOL! And the little turtle was popped up on some foam tape to give a tad of dimension.  Since these will be mailed, I presume, I didn't want too much bulk.
I used some circle dies from Lifestyle Crafts and cut the scalloped circle from a Spellbinder die onto some orange paper which I embossed with a Cuttlebug embossing folder called "Tiny Bubbles".
I used a sentiment from an old stamp set that a friend gave me.  There is no name on the set so I don't know who the manufacturer is and Google did not help me! I set the stamp up on my friend, MISTI which made stamping the image in the very same place (since I made multiple cards!) very easy!
I brushed some clear Wink of Stella glitter shimmer over the turtle and the coral and added some glossy accents for "bubbles".
I think my friend will like them.  I would love to receive one of these! :)
They make me want to head south and back to the beach!
And that is it for today...it is wet and gloomy here in Atlanta. We have had so much rain recently but it certainly has helped with all of the pollen!

Happy Crafting!

Sunday, April 12, 2015

Gifting Cards

I recently was asked to address some envelopes for a friend's daughter's wedding invitations. I enjoyed doing it so much...I dabble in calligraphy and decorative writing so it was so much fun to do it. I was really happy with the results...I handed the finished envelopes off to the bride's mother the other day and she said she loved them and thought they looked fantastic. I was proud. LOL!

I decided it would be fun to make the bride a set of thank you note cards that she could send out.  I had asked her mother what the bride's wedding colors were and she said "cream, blush, and celadon green".  What the heck??!  LOL!!! I'd never heard of celadon green but apparently it's a grayish green. Anyway, I figured the chance of getting an exact match with that green would be difficult so decided to just use some paper from an "old" paper stack I had on hand.  I used Neenah off white cardstock for my base.  I decided to make the cards mostly flat for easy mailing for her.  I initially put ribbon on but decided to minimize it and simplify it and took the ribbon off.

I used my new BFF MISTI to stamp the sentiment and am always amazed how quick and fast it is to use when you are doing multiple cards AND most importantly for me...how easy it is to align to get the perfectly straight look.

Here are the cards and I used the Paper Smooches Roses die set and the sentiment is Paper Smooches Lovely Thoughts:

 I love that die set....

 I also used the stitched rectangle set for my mat from Simon Says Stamp. The mat was popped up on some Stampin' Up foam dimensionals.

 I added a few gold pearls for a little more interest and they were done pretty quickly.

Fun and easy...and I think she will enjoy using them for some "special" thank yous!

I also made a little box to hold the cards in from a file by Lori Whitlock purchased from the Silhouette Online store and cut on my Cameo.  I've said it before...Lori Whitlock's are always so perfect and cut so well!  She must have been an engineer in a previous life!

Here is the box...using the same papers from the roses and leaves:
The bride's initials were also cut on the Cameo using a font I have installed on my computer that I love...Lavenderia.

Here is another look...a little creamy organza bow finished it off:


And that's it for today...Happy Crafting and Happy Sunday!

Tuesday, April 7, 2015

Project Life, 2015: February Layout 3

Without further ado...here are my Project Life layouts which will close out February.  I ended up doing 3 sets of layouts for this month and I think it worked perfectly...

Here is the two page layout side by side so you get the full effect of how it will look printed if I ever make it to the printing stage.


I used Just Jaimee's February 2014 Storyteller kit, and my usual assortment of templates (Tracy Larsen and the Lilypad). In this kit by Jaimee she also included some photo templates and I snuck in a couple of those as well.
Here is the left side:

And here is the right:
Lots of fun, food and time at the beach!

Happy Crafting to you!

Monday, April 6, 2015

Project Life, 2015 February 2

Well, hello...everyone!  I hope everyone had a wonderful Easter...or for those celebrating Passover that you are enjoying those celebrations this week.

I did get back to a tad of Project Life, 2015 the other day.  As I've mentioned before I am not doing week by week layouts...I'm just filling pages with photos basically within a particular month.  This is working well for me...as some weeks I have a ton of photos and some not so many.  As I'm not one to generally scrapbook or journal about my favorite color of fingernail polish...well, I just didn't want to be taking pictures for the sake of having something to put in my albums so I went to a slightly different format than I have in previous years. 

I'll probably change it next year to something else...LOL!

But I am liking the format for now...I'm enjoying the squared corners vs. rounded corners...I've  made my own 13x13 (digital, of course) templates that I can pretty much pop in cards from the digital kits I've purchased without having to do that infernal re-sizing, which I detest...and then at the end I resize the whole kit and caboodle to 12x12.  This has saved me just a ton of time, I think.  (At least a few minutes here and there!).  It has given me more time to blog the boring details of my Project Life process....LOL!

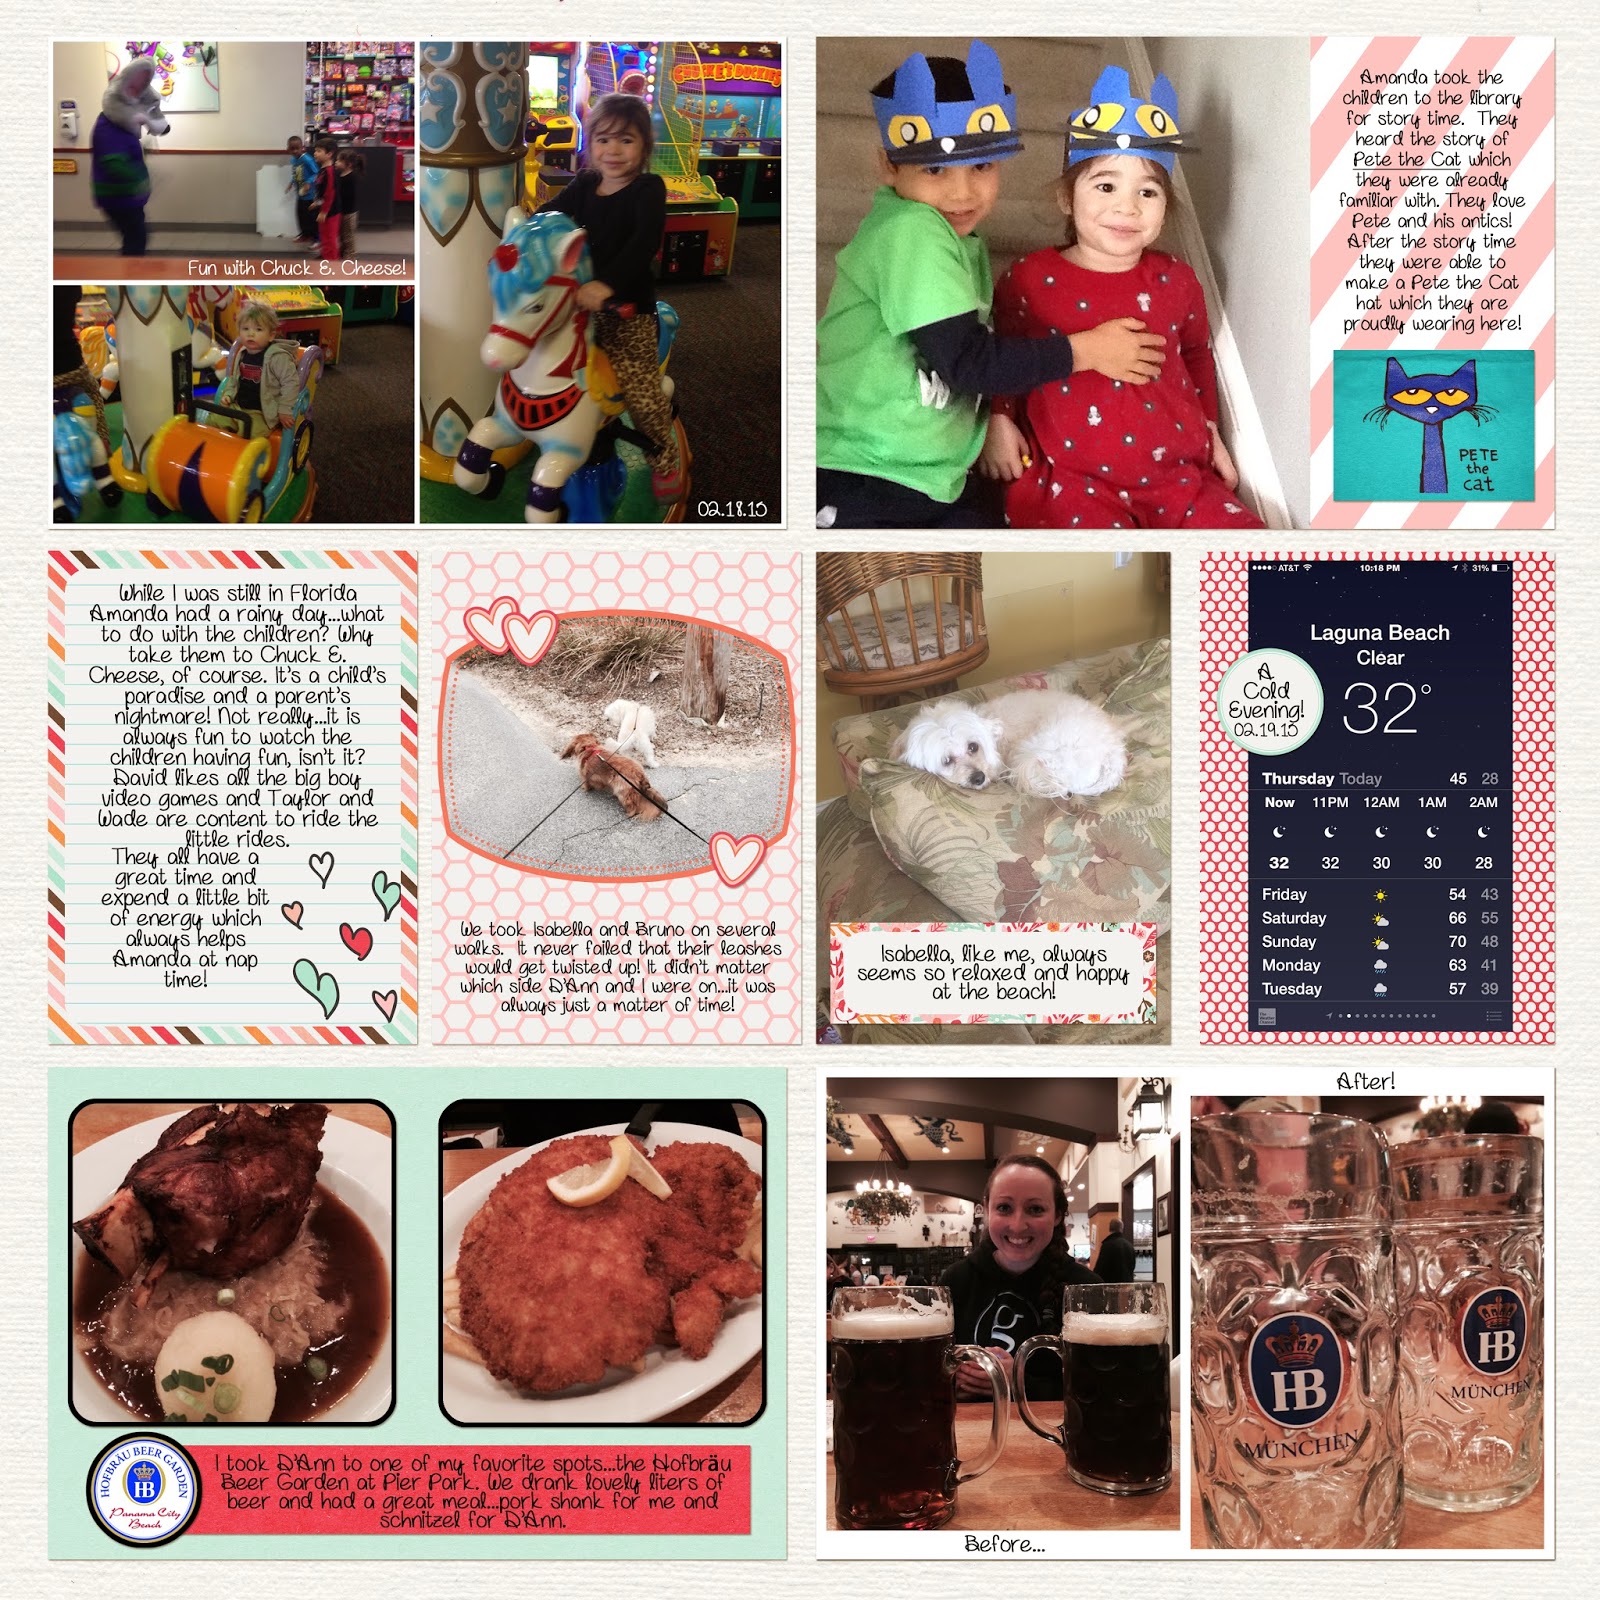
So here are my layouts for February Part 2 which basically covers the second week and up until about February 17.

I used Just Jaimee's Quinn kit which can be purchased at The Lilypad HERE.  I love Just Jaimee's kits...and even though I use them over and over again...no two layouts look alike!

Here is the left side:
Notice my cutie pie dog, Isabella.  We all think our dogs are unique and wonderful. Well, Isabella is...except when she's annoying.  LOL!
And here is the right side:
I do seem to have a lot of photos of my grandkids with food.  I wonder what is up with that? Oh yeah...we are a family of eaters! We all love our food.  My granddaughter loves pickles and egg yolks and sub sandwiches.... my grandson says he's allergic to crackers.

Those kids!

I used my usual assortment of templates for my cards....some from Katie Pertiet, Tracy Larsen, The Lilypad...some I tweaked for my own use.

And that's it for today.  I think I will be able to do just one more layout to finish out February...I'd better get going...we are already well into April!  My goal of staying caught up blew out the first week of 2015!

Oh well....no complaints.  The fun is in the process!

Happy Crafting!

Sunday, April 5, 2015

Happy Easter, Ya'all!

Happy Easter from Atlanta, Georgia! 

My grandkids went to see the Easter Bunny the other day and it was a total #FAIL! But oh so cute anyway....

I'm not sure it was an improvement over 2014 or not...
HAHA...I think the Easter Bunny is signaling...HELP!

Kids will be kids...and it is difficult to get 3 tiny people all on the same page when it comes to photographing them! That's why many of my Project Life photos are blurry or missing body parts.  But even the parts can tell a story can't they?

I did make a few other Easter cards to send...and this was not my own design but rather one created by the fabulous Impressive Ideas stamp store in my area.  They did a make and take one day and I loved the card so bought the stamps to duplicate. Using MISTI helped me crank out quite a few cards in no time at all!

This was done with Impression Obsession stamps.  The teeny gingham paper was actually created with a stamp.  Love it! Oh la la...just think of the possibilities! And I got a great image using my MISTI and reinking!
The little bunny peeps were colored with Copics...and some Wink of Stella clear glitter was painted over one of the bunnies.
See?
Probably not... but it's there, I promise!

So Happy Easter to all of you...time to get in the kitchen and make some deviled eggs!

And Happy Crafting!

Friday, April 3, 2015

Happy Easter!

I made a few Easter cards to send to family and friends using a "HAPPY" die from Impression Obsessions I bought at Impressive Ideas (our fabulous local stamp store) a week or so ago.  I thought this was a great and versatile die.

These cards whipped up pretty quickly...the die cuts beautifully!!!

Here is the first one I made:


"Easter" was done with the Marketing Script font and cut on my Silhouette Cameo.  I also cut a shadow to fit behind it to give it a little more pop as we say in the card creating world.

I cut the letter for "HAPPY" a second time and adhered them to the card base with some foam tape.
And lastly...a bit of ribbon finished off this card.

Here is the second one I made:


Same idea...just done in a horizontal manner.

Again...easy and fast.  How great is this die??? I can use it for Birthdays, Halloween, 4th of July...any number of other significant days, ya know?

Definitely one to be used again!

Happy Crafting and Happy Easter!