Friday, April 19, 2013

Bigger Than Expected!

My whole craft room/studio redo has required so much more time and effort than I ever dreamed it would!  Yikes!!! And I'm still not done!  But one thing I've learned is that I can only do it for about an hour or so a day and then I gotta get outta there!  HAHA!

But it really is getting close to being done and I think I will really like my new organizational systems.  At least for now.  One thing I've noticed is that paper crafters generally love to organize and reorganize. What's up with that?!

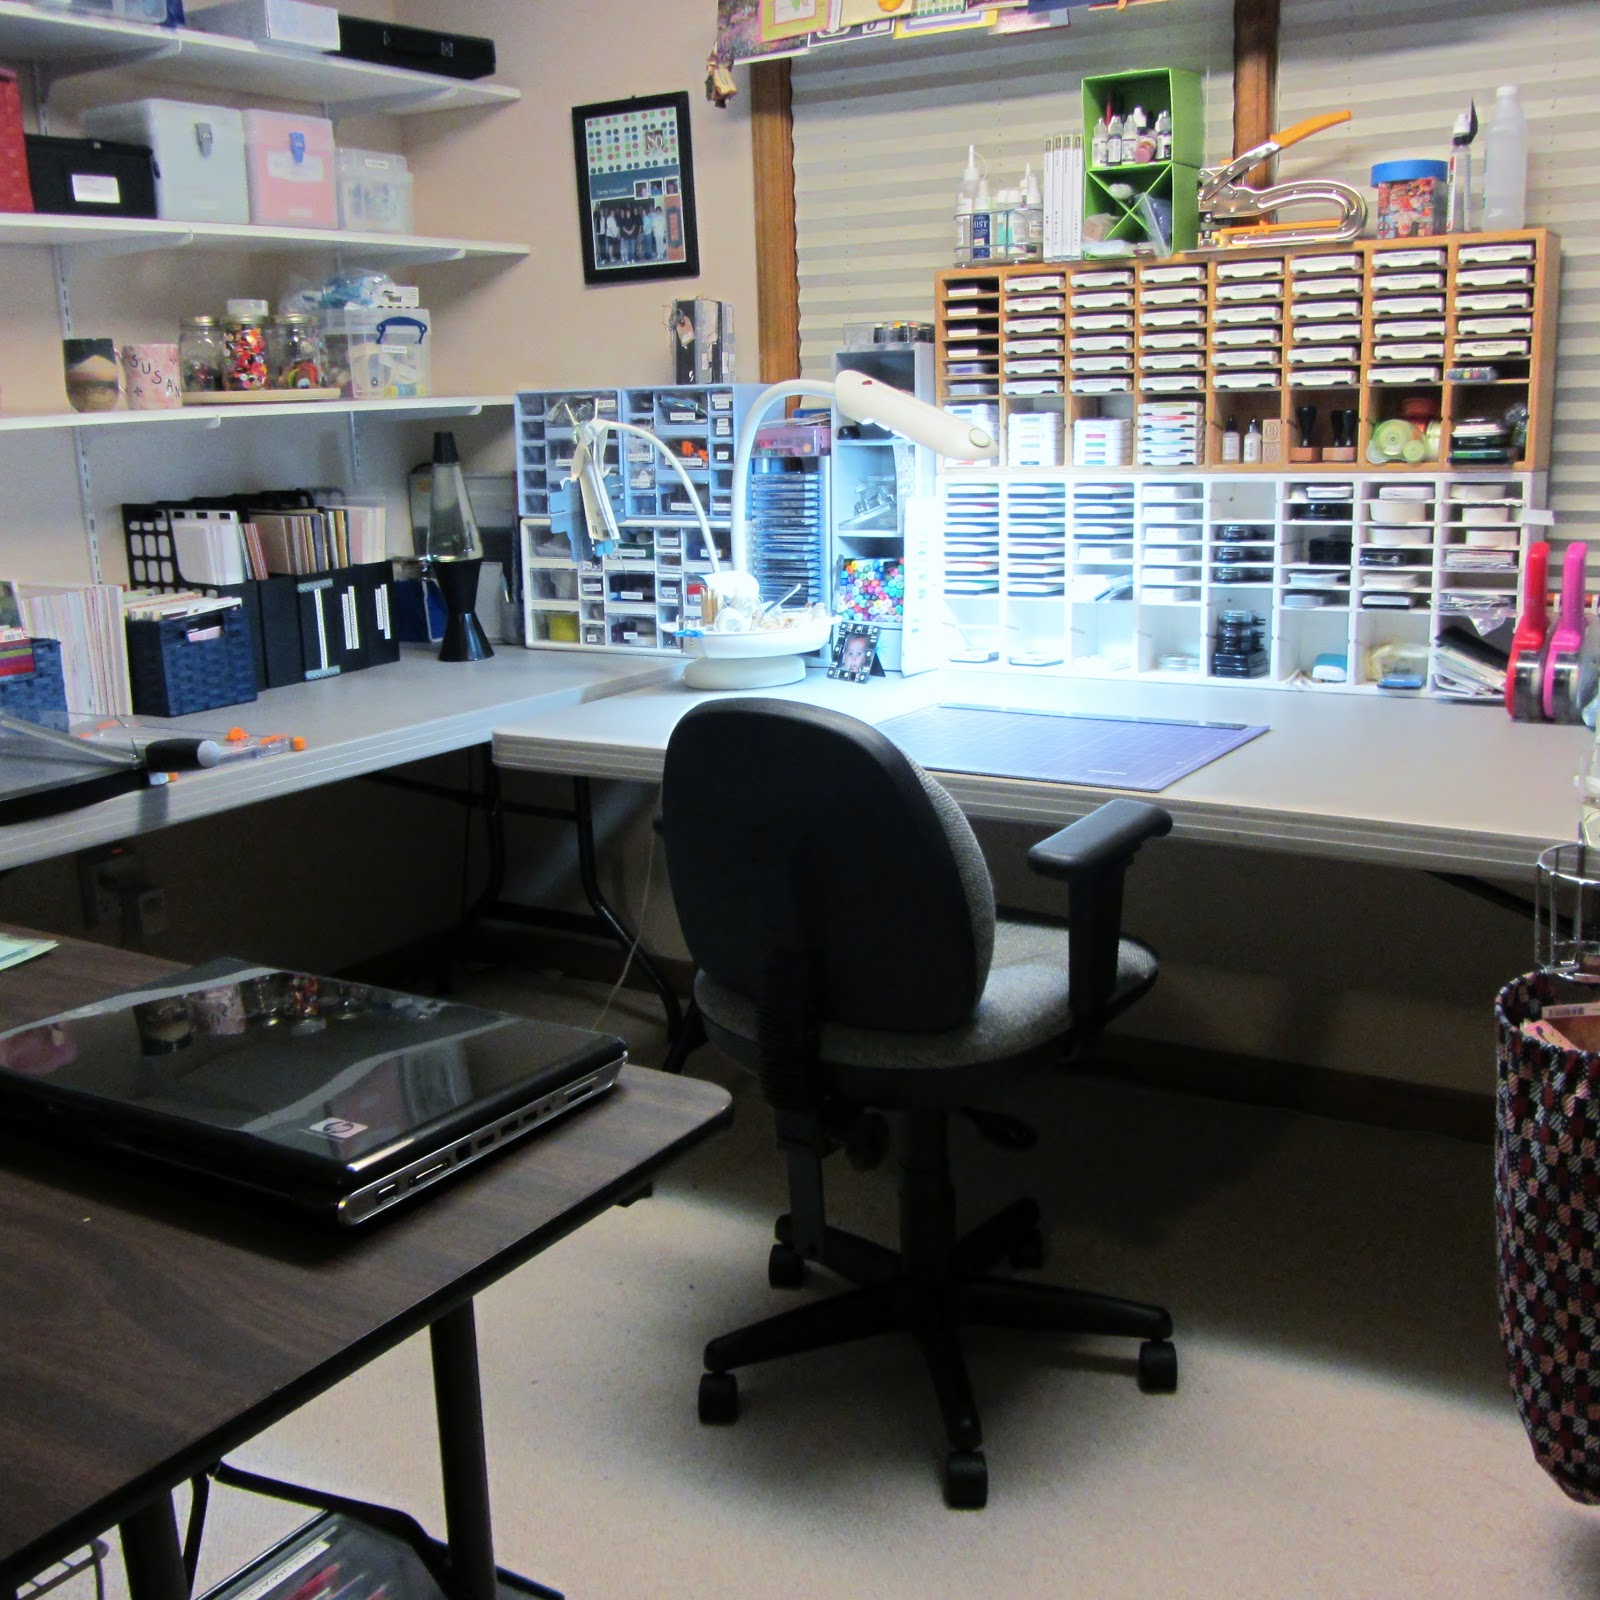
The other day I posted "Taking Shape" and showed a picture of my nice cleaned off table.  Then Hurricane Debbie showed up and my room was again torn up and destroyed.  Debbie is a good friend of mine who is fabulous at organizing and she saw a great need to redo just about everything I'd done.  LOL!  So...for the next 5 days my table top was never to be seen.  But it has all been worth it and I'll share my progress to date.  Here it is in bits and pieces.

First of all....I love paper stacks although I am not buying 12x12 any longer (well, except for the cute one I got half priced at Michaels the other day. LOL!).  I do love the stacks I have though and had them in a basket crate thing but bought this 56 qt Sterlite container for about $7 the other day.  It's too heavy to lift but I don't plan for it to go anywhere anyway!  It sits under the table where my paper trimmers are.  I write the name of the stack and manufacturer on the binding with a Sharpie so that I can more easily pull out the one I want.

This container works well for these stacks and with the top on no dust or other particles can get in.
They are a perfect fit!

Next is a cube that I got at Michaels a while back and I have my white, brown and black cardstock stored in it.  I kind of wanted all my cardstock in one place but for now it didn't quite work out that way....it is all about an arms length to the right and to the left of where I sit.  I may work on that arrangement but that is what it is for now.
On my cutting table I have this very cool heat embossing station that my friend, Cyndi, brought me back from Kansas City.  I am known as the Fire Starter with my heat gun so she is doing her best to try to keep me safe.  Thanks, Cyndi.  Come to think of it...since I got this stand I have not burned any carpet!
Ahem....I do love 6x6 and 8x8 paper pads and here is my collection of those.  Right within easy reach. I love having all these because I might make a card one day.  (Waving at you, Cyndi!)
I have my plain 8 1/2 by 11 cardstock in magazine holders...some are labeled if the paper is oh so special and some are not.
I store most of my buttons in mason jars on a Lazy  Susan (I always took issue with that term! LOL!).

To the right of where I sit I have some wire racks and cubes that I purchased at Target a long time ago...long before Michael's came out with the nice cube system.  I'm really trying to use what I have, though so this still works for me although sometimes I wish it looked a little better! LOL!
On the right is most of my ribbon (oh, yeah...I have way more on the other side of the room which I'll share in another post). and it's in boxes and labeled.  Debbie did a great job of organizing the boxes by color.  It's so easy to see what I have.
 There is also a box with Baker's twine as well as boxes for embroidery floss and fibers.
 And...at the very bottom I have my colored 12x12 cardstock as you can see here.
 In the middle section of the wire racks I have card packs and envelopes (yes, I have a lot...and now they are all in one place! Hallelujah!).  Below that are some Hero Arts cards and products.

I have this old Cropper Hopper file box that I am using for vellum, acetate, and other specialty type papers.

 Back over near my white, brown and black cardstock I have a large box that holds my paper scraps.

I try not to keep the smallest bits but these scraps are wonderful for die cutting and I go to my box often! They are all sorted by color.
 I store my punches in the over the door shoe racks.  I have tried other ways to store punches....boxes, drawers, etc...but this works well for me because I can easily see what I have.  I have another hanger over another door with my Martha Stewart punches.
 On my table I have this little storage thing I picked up at Goodwill for a dollar which holds my Copics and my Distress pens as well as my acrylic blocks.  To the left of the little storage thing is a CD rack with my Papertrey Ink stamps.
 And here is a picture of my work table again....and you can see my ink pad storage.  I  need to paint the top one at some time...some day...maybe... LOL!  I'm probably a little more about function than I am about looks so for now this is just fine! ;)
Still a good bit to do but if I put my mind to it I think I might be able to be done by tomorrow.  I'm having crafting withdrawal but I really need to finish up before I start any new projects.  That's the deal I've made with myself anyway! ;)

I hope you've enjoyed a little peek into my studio!

Happy Crafting.

Friday, April 12, 2013

Taking Shape!

When my husband and I moved into this house it was a bit overwhelming as about any move can be.  My husband, Mr. Positive, would always say "taking shape" whenever a box was unpacked or a picture was hung on the wall.  I think he said "taking shape" 3,803 times.  After about 8 times I'd had enough! LOL! And I wanted to tell him where he could take his shapes!  I'm bad....

So earlier today I posted a picture of my scrapbook/craft room and it was a very disturbing picture.  Stuff everywhere!  But I've worked hard on it....and it is "taking shape".

Here is my work area now....at least you can see the table surface!  Yay me!
Still needs some organizing which my friend, Debbie, and I will work on tomorrow....but it IS getting there! I'm happy! 

I'm still a couple of days away from crafting but I'm getting excited about my reconfigured creativity space!

Happy Crafting!

Where in the World....

....is Susan?

...hidden under an avalanche of scrapbooking and cardmaking items in her craft "studio"! Please send in the National Guard.  She needs to be rescued! ;)

Here is an in process photo....I  have just been piling up stuff on my work surfaces so don't think I work in ALL this mess.  I do get messy but I'm not this bad!  LOL!

Scary, huh?
Why is it when we get the urge to organize that we end up making an even bigger mess than when we started out???  This has been a several day affair already....and I am ready to go immerse myself again.  I'm hoping to get everything out today that I'm getting rid of....and then my friend Debbie is coming over tomorrow to help me organize and get my work flow right!  Yay, Debbie!

I will take pictures when it is all cleaned up and neat again!

Hopefully I'll see you all in a few days...I'm missing my crafting!

Sunday, April 7, 2013

So Happy Together...

Oh my....I had the brainy idea to reorganize my craft studio (I love calling it a "studio"...sounds very hoity toity and artsy!)....I worked on it a good bit yesterday and am about .0793% done.  (Did you catch the decimal??)  LOL!!!  I am getting rid of that old stuff that is half used that I kept hanging onto....just in case. 
If you don't hear from me in the next 3 or 4 days please send the National Guard in....I may be buried under an avalanche!

So I won't be crafting again anytime soon but I did make this card the other day.  I used Vicky's Clips n Cuts card HERE as inspiration.  She is so good at looking at printed papers and seeing other things you can do with them.  Anyway, it is not totally CASED (copied and stole everything) but you can see that I definitely used her idea with the paper strip and ribbon...oh and the placement of the cute little acrylic hearts!! :)  I added a little Washi tape to my version....I love this particular tape!

Here is my version:
I used the Simon Says Stamp April card kit.  Great kit...love the stamp set with it...so many uses on that one although I didn't do any stamping on the outside of this card. 

Happy Crafting....and don't forget....if you don't hear from me please notify the authorities!

Saturday, April 6, 2013

Project Life: Easter

I had so many photos from Easter than I wanted to use that I decided to make a separate 2 page layout for my Project Life book.  That's what I love about Project Life....there aren't any rules....you can make them up as you go! Whatever works...works!
I tell you....I've been scrapbooking since I was a kid...I used to save tickets and memorabilia and tape them into scrapbooks.  And I love scrapbooking 12x12 layouts in the traditional way but I am absolutely in LOVE with Project Life style of scrapbooking using slotted page inserts.   Now I am not using the Core Kits from Becky Higgins but instead am using up papers and things I have on hand (with a few extras I've purchased)!  This style of scrapping can be much less expensive and much EASIER and faster to do!  Sure...I love the big decorative fancy-schmancy pages but I love how this has freed me up!  I don't stress about paper colors or themes matching my photos...or trying to find the absolutely right hued embellishments, etc.  I spend the most time each week preparing my photos for Project Life but once I sit down to create my pages it goes pretty smoothly and quickly.  I am so grateful my friend, Donna Gibson, of 365 Days of Donna encouraged this system.  She is doing the digital version and her pages look fabulous!  I may try that next year....but I have such a love paper and working with it.  It has gotten me all excited about scrapbooking again.  And my kids and grandkids LOVE looking at my book...and that's what it's all about, isn't it?
And lastly....I have done 41 pages this year so far!  And it's only April!  I don't know that I've ever even done 41 pages in a whole year! LOL!

OK, enough yapping....here are my Easter Layouts.  The papers and embellishments are from TPC Studio.
Left Side:
 The papers and embellishments are from a kit I bought a year or two ago.  I just LOVE using up scraps and things I have on hand!
The journaling card and the bunny card were cut with my Silhouette.


The Easter Card was blinged up....just a bit!
Here is the right side:

Again...the journaling card at the bottom was cut with my Cameo.

And then I did an insert page with 4x4 photos:


And finally....the other side of the insert:
One recurring them I see in the past two weeks is the love my grandkids have for the icing off the cupcake! LOL!  I have quite a few messy face pictures! :)

My big job the next few days is to reorganize AND CLEAN UP my craft room.  Time to purge!  Do I really need 3,580.762 pieces of scrap paper that are less than 2x3 inches in size???  LOL! I'm sure many of you know exactly what I'm talking about!!!

Happy Crafting!

Friday, April 5, 2013

Friendship Card and Project Life: Week 13

I was a busy little crafting gal yesterday finishing up Project Life for Week 13, doing and insert page for Easter as well as another 2 page Easter spread.  Got that?  AND I made two cards with the Simon Says Stamp April Card Kit.   That is major output for me....I'm more of a 1 thing a week sort of person! LOL!

Here is one of the cards I made:
The colors of the little tulips are rather subtle but it does look a lot more vibrant in real life.  :)  The tulips were cut with a Memory Box die.  The black strip along the bottom is Washi tape.....all papers are from the April Simon Says Stamp Kit. 
Here is a bit of a closeup of the tulips which I topped with some Stampin' Up Dazzling Details.
This is a different look for me because I usually go BOLD but I like the combo of bold and subtle here.

And now onto Project Life.  Here is the right side of the layout shared yesterday.  Again I used Recollections cards that I had gotten at Micheal's for not much more than a "song and a dance"!

The card on the right (shown below) was cut from a file purchased in the Silhouette Online store.

It started off wet and dark here this morning but the sun is starting to peek through and we are supposed to have an absolutely awesome weekend!

Happy Crafting!

Thursday, April 4, 2013

Project Life: Week 13 (Left Side)

I've had a very uncrafty last couple of days but they were good ones nonetheless!  My good friend was here from Florida for nearly a week and then we celebrated Easter at my house on Sunday.  My kids were here, my grandkids were here as well as a few more guests.  It was a great day despite it being a bit wet for an outdoor egg hunt.

Anyway, I got back into my craft room last night and worked on my Project Life for Week 13 which was March 24-March 30.  Here is the left side:

The papers I used this week were from Michael's own brand: Recollections.  I love the bright colors and they work great for Project Life at a loooooow price!  I used templates from The LilyPad for the photo collages.  How about the photo(s) on the bottom right.  I let my 3 1/3 year old grandson have at it (is that a southern expression?) with my camera on occasion and he does a wonderful job taking photos.  I decided to include those this week....our little budding photographer!

I added a few K and Company daisies to a filler card and added a wood veneer butterfly (Recollections but I think they are made by Studio Calico) that I inked with some Hero Arts Neon ink.  I also added some Stampin' Up Dazzling Details to the centers of the flowers and the butterfly and then stitched a flight trail for the little butterfly.
 I used one of the 3x4 inch slots for my "week" card.  I cut out the word "week" and offset it with my Silhouette.  I cannot remember what font I used but it did begin with a "C".  LOL!  The numbers are metal and are by Tim Holtz....and picked up ON CLEARANCE (read: very low price) at Michael's. 
 I added a wooden bird also inked with Hero Arts Neon ink to my "A Little Birdie Told Me...." card. 
Now....off to do the left side!

It's rainy here in Atlanta today... a perfect day to stay inside and craft!

Happy Crafting to You!